Disclaimer: This document serves as a practical guide, sharing the key hardware, firmware, and web components that I used in the development of Configur.io during my time at Hakkei.
As a developer, I found that understanding the intricacies of USB and HID devices was not straightforward, and gathering this information was a lengthy process. This guide is not meant to be a comprehensive manual on all things WebHID, HID, and USB.
Instead, it's designed to share my experiences and provide you with the "need-to-know" information, bridging the gap between "I don't know what I don't know" and a basic understanding that can be built upon.
It's a roadmap that others can follow to build their own web-based keyboard configurator projects, from hardware design and firmware development to leveraging web APIs.
HID: Developer's Guide
In this section, I'll simplify the key hardware concepts of HID that I wish were clear to me when we set out to create Configur.io. We'll take a practical approach, focusing on the essential knowledge you need to get started with HID, without getting lost in the technical jargon. I've also incorporated visuals and relatable analogies that web developers may find helpful.
HID Devices
Before we discuss WebHID and WebUSB, it's important to clarify the differences between HID and USB devices.
USB HID (Human Interface Device) [^3], represents a standard for computer peripherals that humans interact with. Keyboards, mice, game controllers and touchscreens are all HID devices.
They are a type of USB device that's specifically designed for human interaction that uses the HID Protocol.
On the other hand, USB is a broader category that includes not just HIDs, but also many other types of devices using other protocols depending on their function.
You can visualize the relationship between USB devices and HID devices like this:
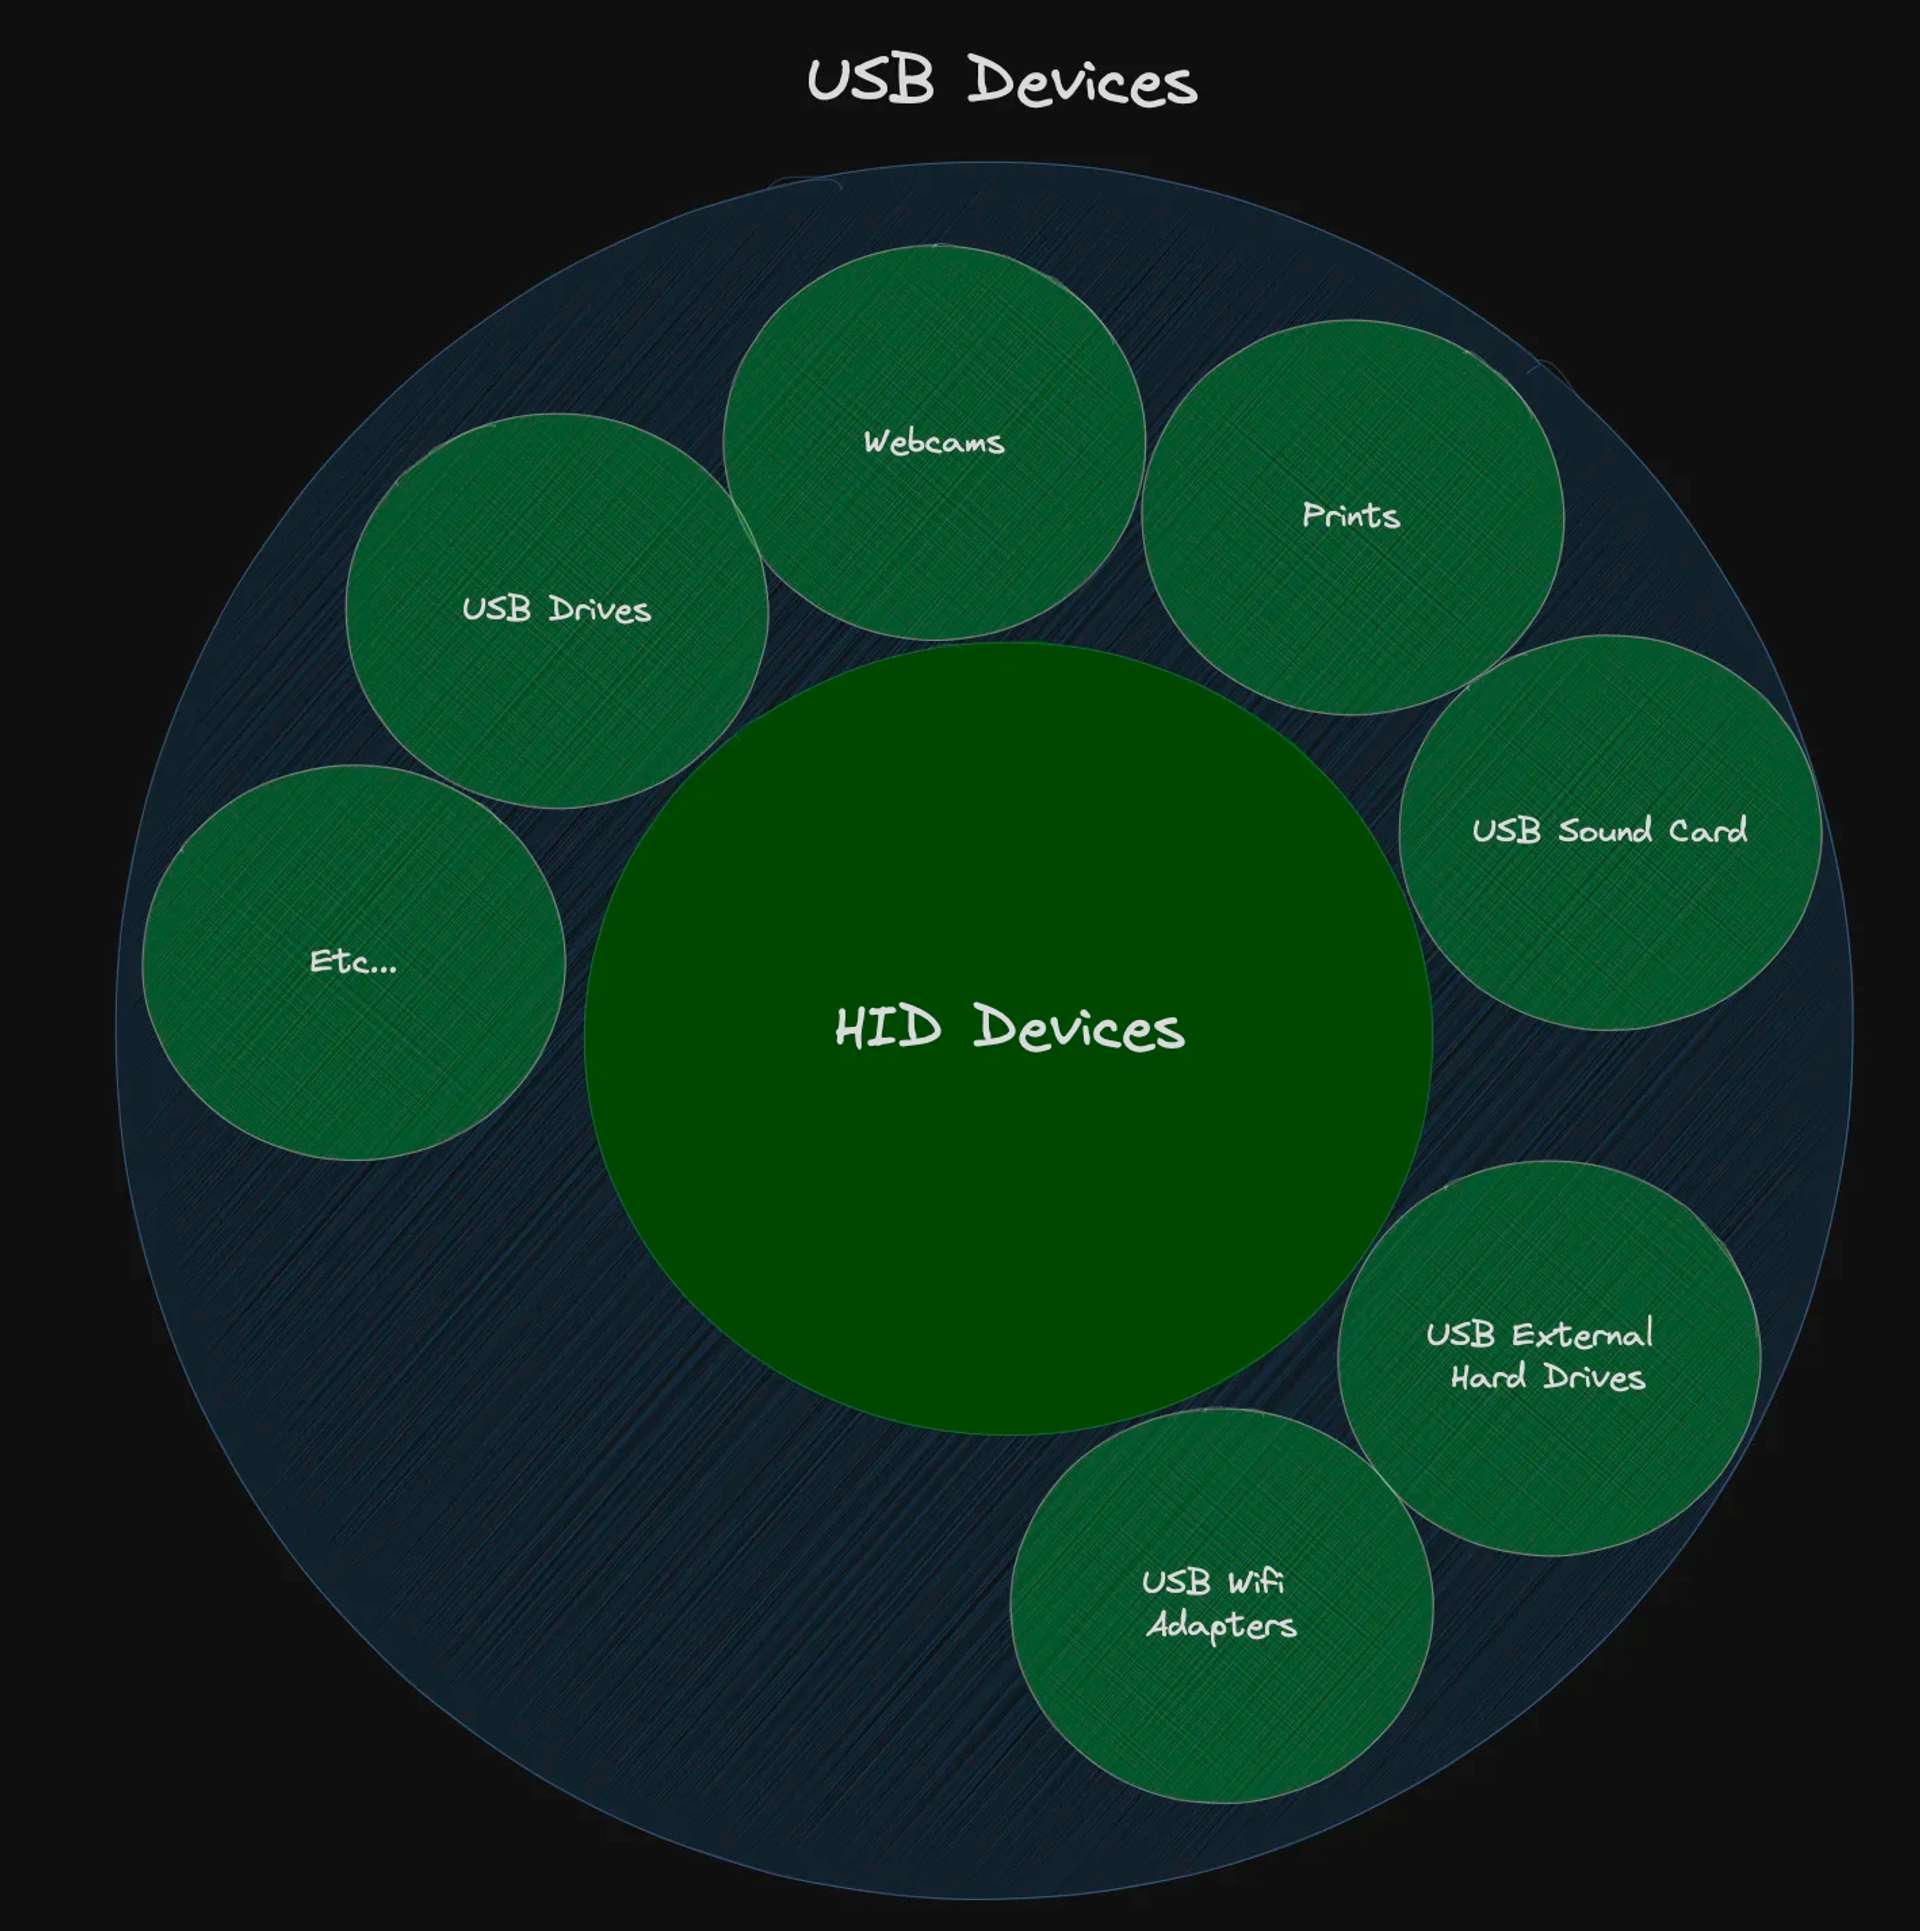
Just as all squares are rectangles but not all rectangles are squares...
All HID devices fall under the umbrella of USB devices, but not every USB device is a HID device.
We'll revisit how this applies to our application later.
| Device Type | Description | Examples |
|---|---|---|
| HID (Human Interface Devices) | These are a type of USB device that's specifically designed for human interaction. They use the HID protocol, which allows them to be easily recognized and used by a computer without needing any special drivers. | Keyboards, mice, game controllers |
| USB (Universal Serial Bus) Devices | This is a broader category that includes many different types of devices. These devices can use different protocols depending on their function. | Flash drives, printers, webcams, HIDs |
--
HID Protocol
Whether you're communicating with a device over USB, I2C, or Bluetooth, if the device is an HID device, it will use the HID protocol to communicate.
It's like a common language that bridges the gap between different devices. This standardization makes it easier for developers to communicate with a wide variety of devices.
Think of it like this:
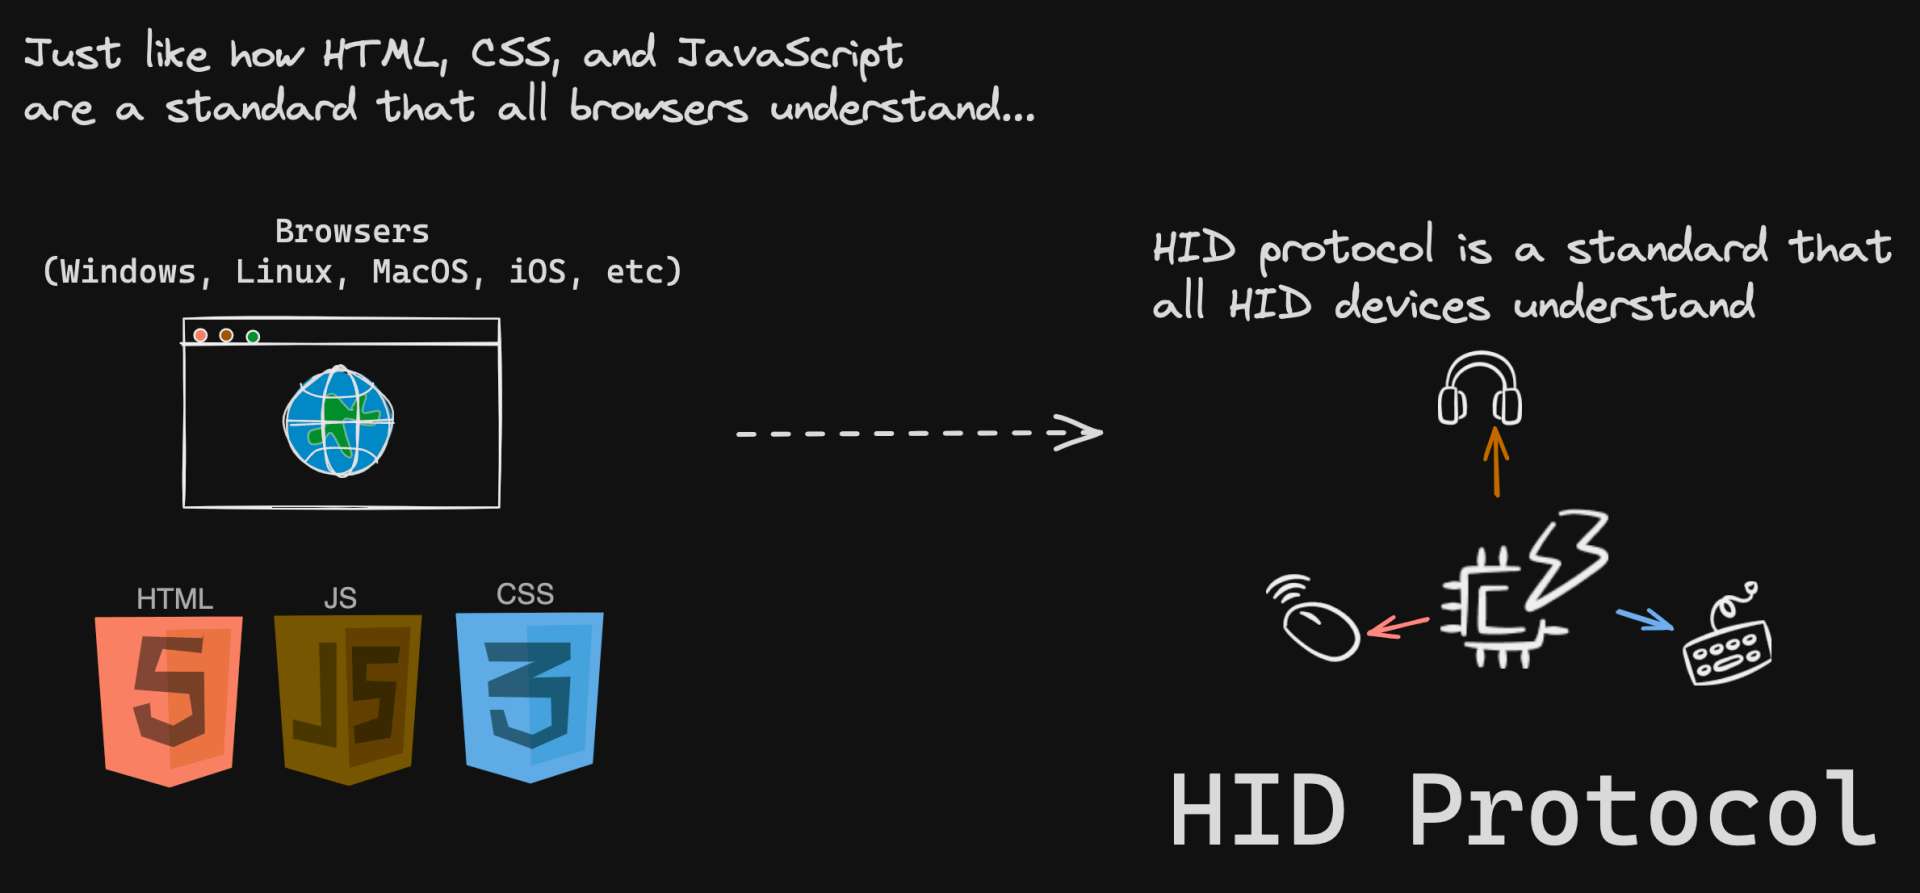
Just as HTML, CSS, and JavaScript are standards that all browsers understand, the HID protocol is a standard that all HID devices understand.
HID Interfaces
An HID Interface is a group of "endpoints" in a USB or Bluetooth device, each representing a specific function.
As a web developer, you typically don't have to worry about the low-level details of communication with HID devices, such as managing endpoints. These details are handled by the operating system and Web APIs we'll later discuss.
For instance, a keyboard-mouse combo might have separate interfaces for each function.
Think of it like a Swiss Army knife, where each tool is an interface with a unique function:
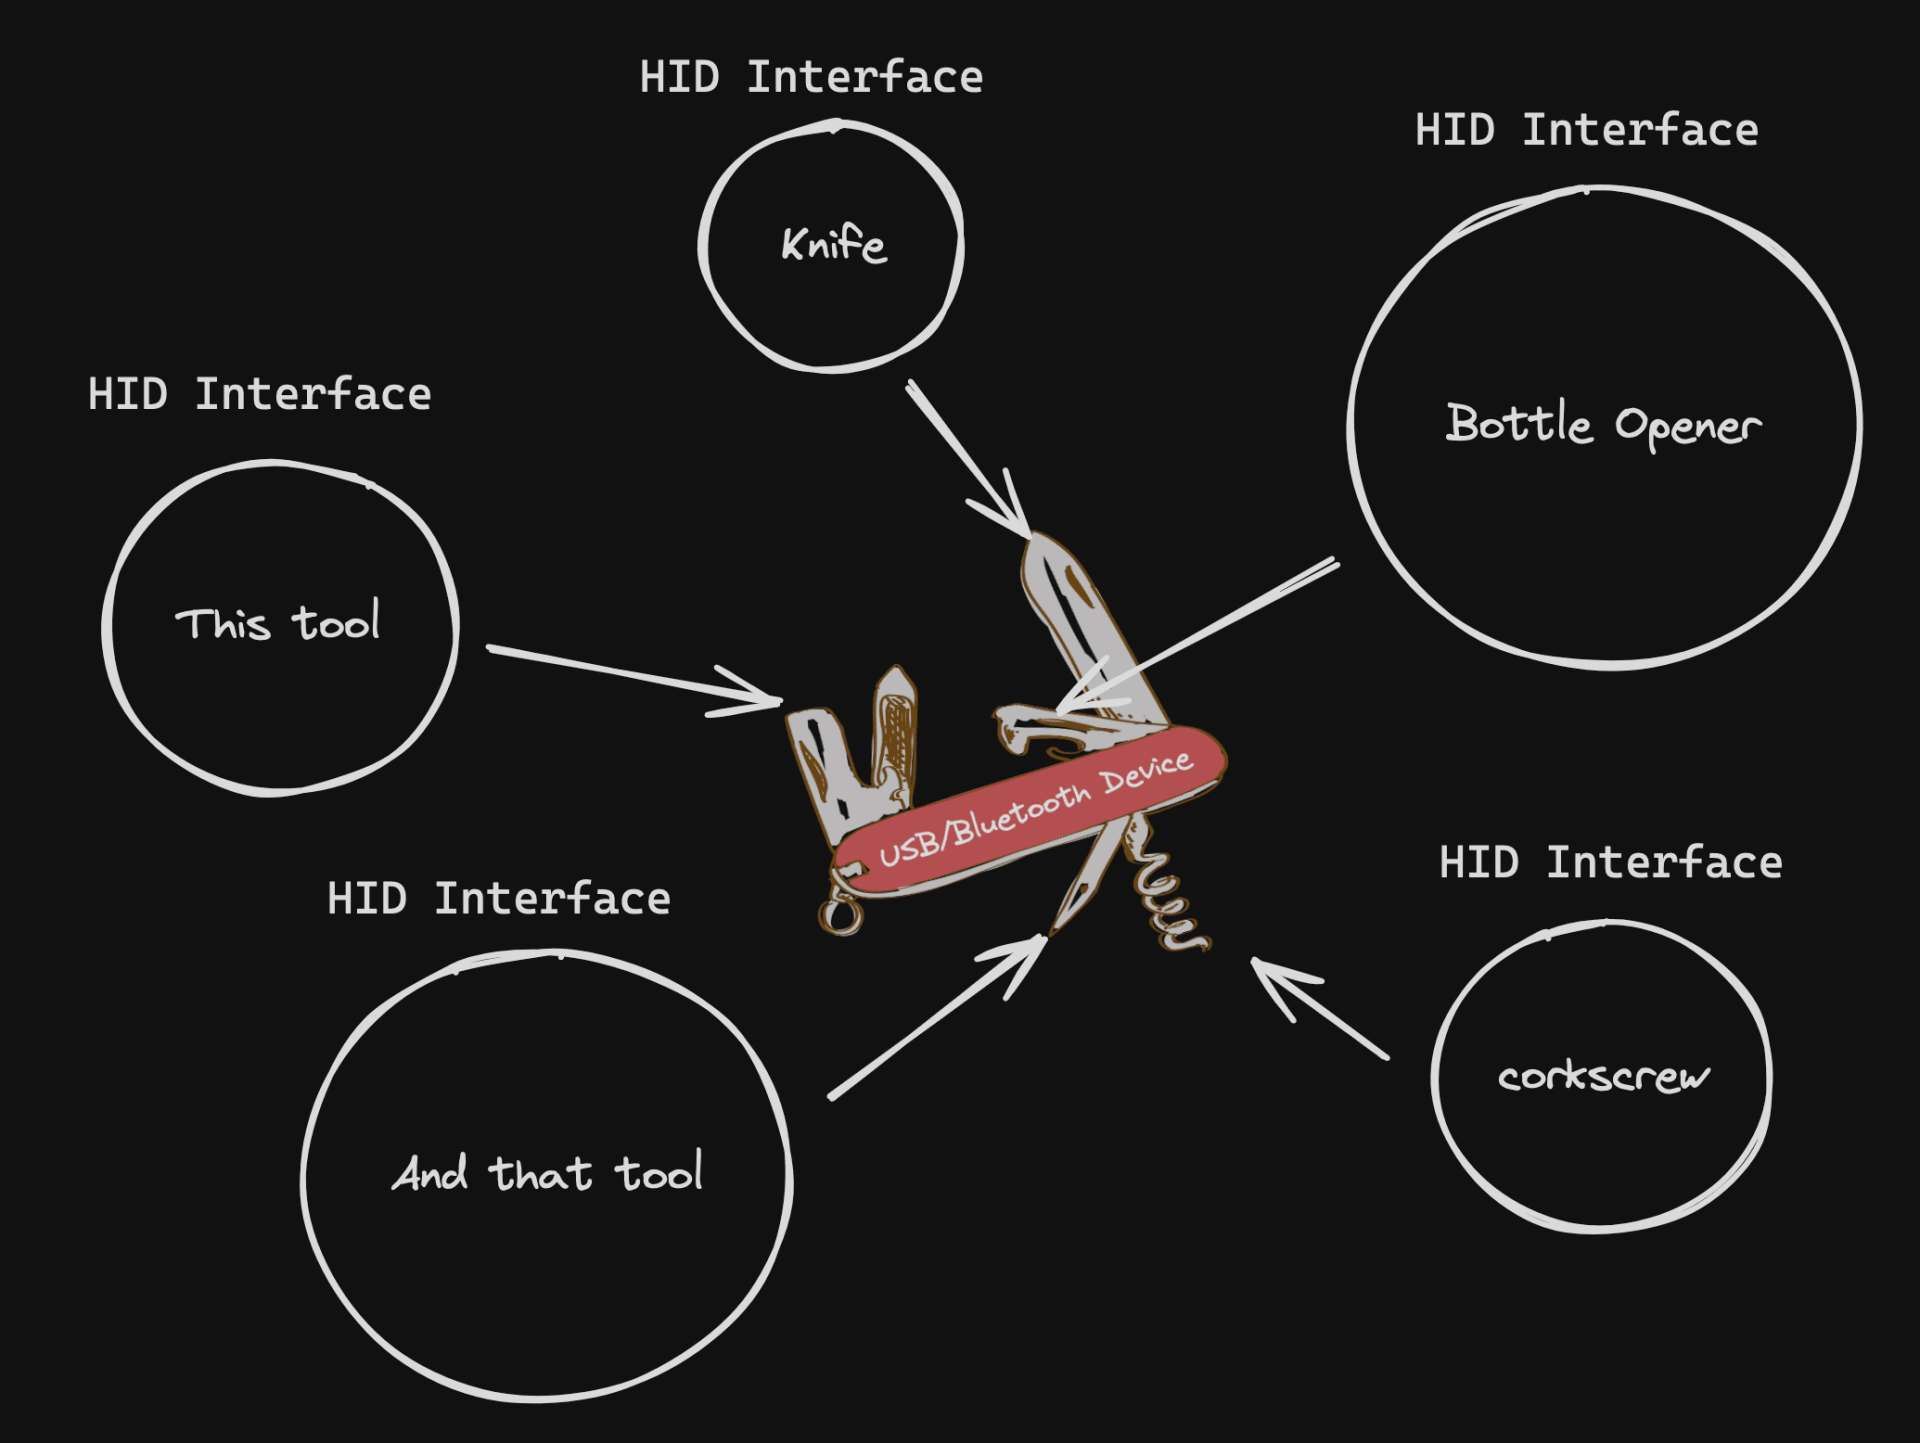
Each tool in the gadget (like the knife, the screwdriver, the bottle opener, etc.) is like an HID interface. Each one has a specific function it performs.
| Swiss Army Tool | Some HID Interface | Function |
|---|---|---|
| Knife | USB Device | Performs specific tasks using the USB protocol |
| Screwdriver | Bluetooth Device | Performs specific tasks using the Bluetooth protocol |
| Bottle Opener | Other HID Device | Performs specific tasks using other HID protocols |
Report Descriptors
Report Descriptors are a crucial part of the HID protocol. They define the format and meaning of the data packets, known as reports, that a device sends and receives.
In other words,
It's an instruction describing the format and meaning of the data that a device sends and receives.
Think of it like an API in a web application.
The back-end (device) sends data (like a JSON object) to the front-end (host). The API (Report Descriptor) defines the structure of this data, allowing the front-end to interpret it correctly.
Here's a table to illustrate this analogy:
| Real World Example | Device-Host Analogy |
|---|---|
| Back-end | Device |
| Front-end | Host |
| API | Report Descriptor |
| JSON object | Data |
| API structure | Report Descriptor structure |
| Implementing API | Implementing Report Descriptor |
--
Data from devices, such as keyboards, is transmitted in hex bytes. Without a guide to interpret them, these bytes can seem like an gibberish.
Consider this real-world scenario:
When the application invokes the getVersionNumber() function to communicate with the Hakkei keyboard, it sends the following data:0A 01 00 01 00 00 04 03 00 04 03 38 31 65 39 63
35 36 65 37 58 00 00 00 00 00 38 31 65 39 63 35
36 65 37 58 00 00 00 00 00 00 00 00 00 00 00 00
00 00 00 00 00 00 00 00 00 00 00 00 00 00 00 00
However, using our Report Descriptors, we can understand that this data represents the firmware version of the keyboard.
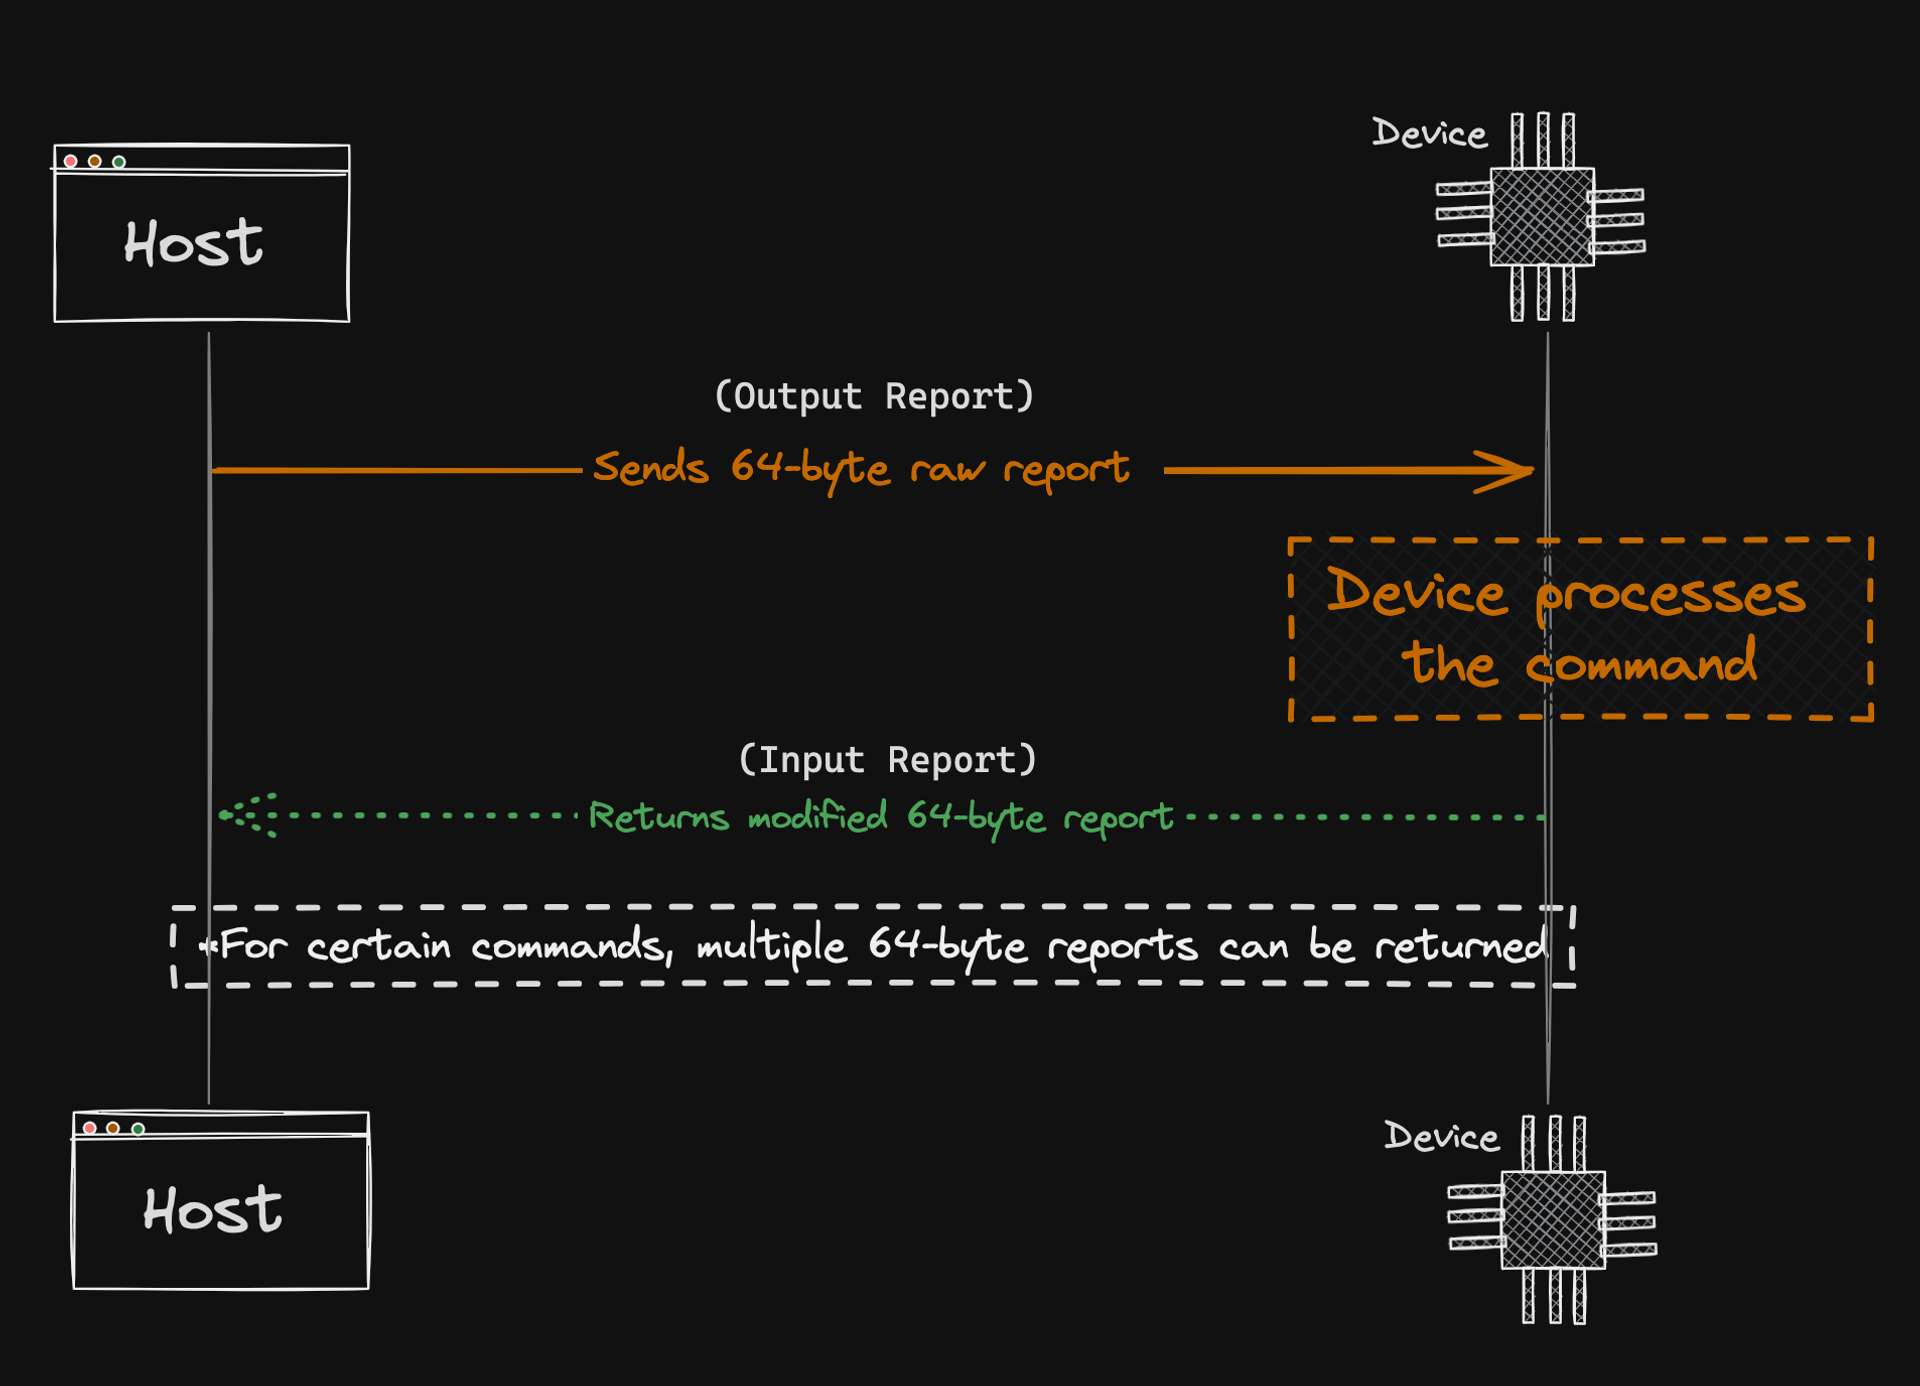
Input/Output Reports
Finally, let's discuss how USB HID devices communicate with a host computer.
In the HID protocol, data is transferred between the device and the host using Input/Output Reports.
Just a heads up!
You might see these referred to as I/O Reports in some articles or sources. I didn't catch on at first and it ended up confusing me. :p
- Input Reports:
- These are sent from the device to the host.
- They contain data about the state of the device, such as key presses on a keyboard or movements of a mouse.
- Output Reports:
- These are sent from the host to the device.
- They instruct the device to perform certain actions, like turning on an LED on a keyboard.
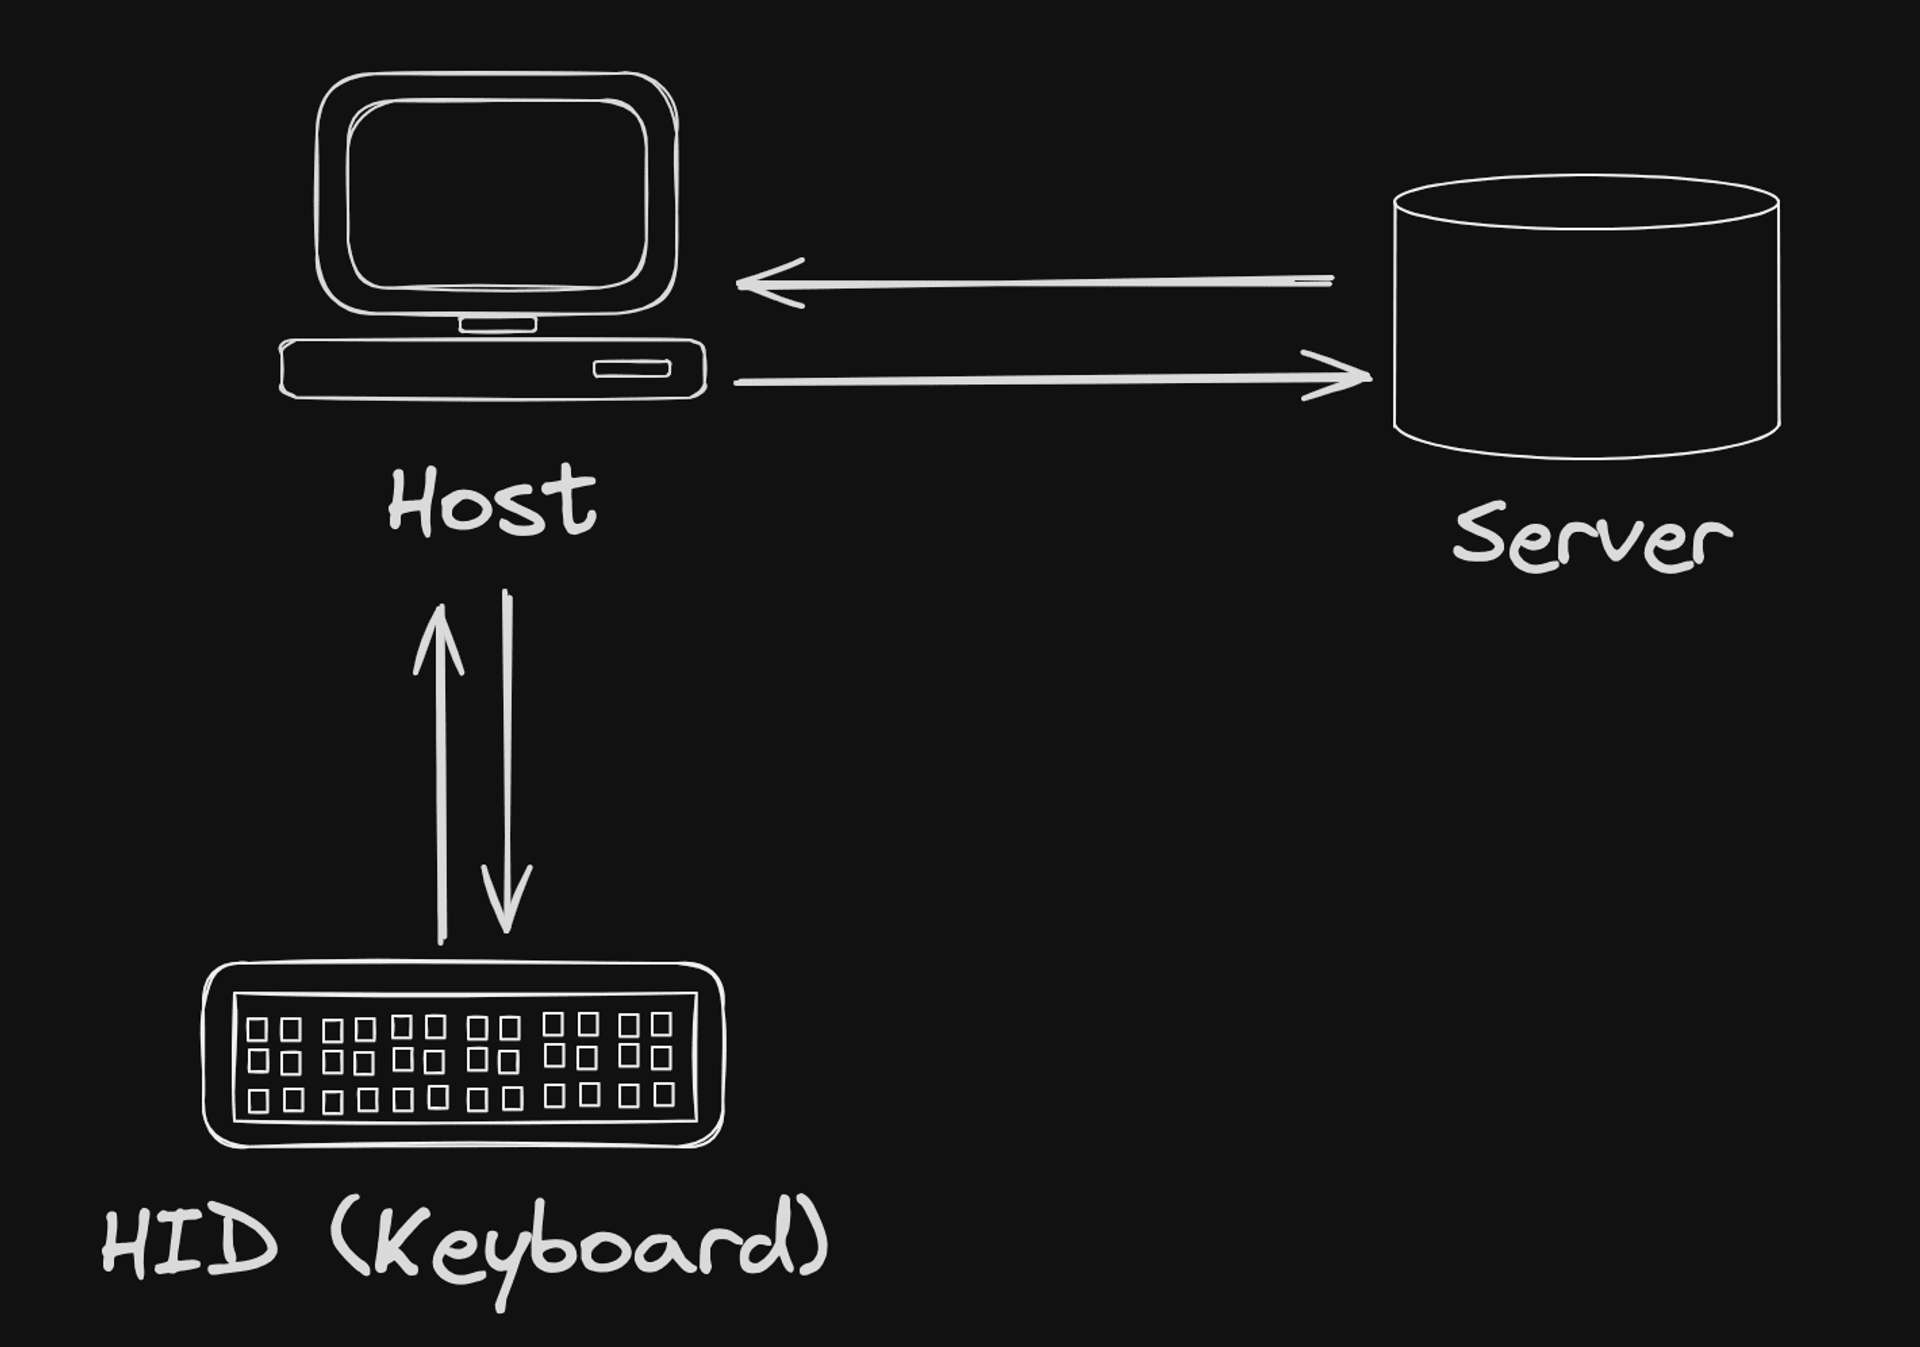
In our application, we use the configurator interface to communicate with the keyboard.
This is done by sending a 64-byte raw report from the host via the output endpoint.
In response, the firmware typically returns the same 64-byte report as a confirmation of receiving input from the host.
We can visualize the flow of data like this:
Important Note
When using Web APIs to communicate with devices like a keyboard, the device doesn't spontaneously send Input Reports.
Instead, it waits for an Output Report (a command or request) from the host.
Once it receives a command, it responds with an Input Report.
This is similar to a Read-Eval-Print Loop (REPL), where the device reads a command, evaluates it, and sends a response.
--
Given the ongoing debate about the potential risks of enabling web access for devices, this design approach is a proactive measure to address security concerns when using Web APIs to communicate with devices.
Just imagine the security implications if someone were to write malicious firmware that runs tasks on your computer without your knowledge.
It would be like having a rogue agent in your system, carrying out operations without your consent if it were not designed this way.
The Web API
Integrating a hardware component into the mix certainly adds a unique layer of complexity, unlike scenarios where you're only dealing with application and backend components.
This new dimension of hardware interaction brings its own set of challenges and considerations, making the development process a more intricate endeavor.
Let's discuss the key elements involved in designing a keyboard configurator from hardware to enabling WebHID and WebUSB. This will be a high-level exploration, providing a broad overview of the process. I'll save the nitty-gritty implementation details for another post.
Keyboard MCU
Internally, we designed the keyboard for manufacturing using the Nordic Nordic nRF5280.
At the heart of every hardware electronic, including keyboards, is the MCU, or microcontroller unit. This is what controls the functions of the keyboard.
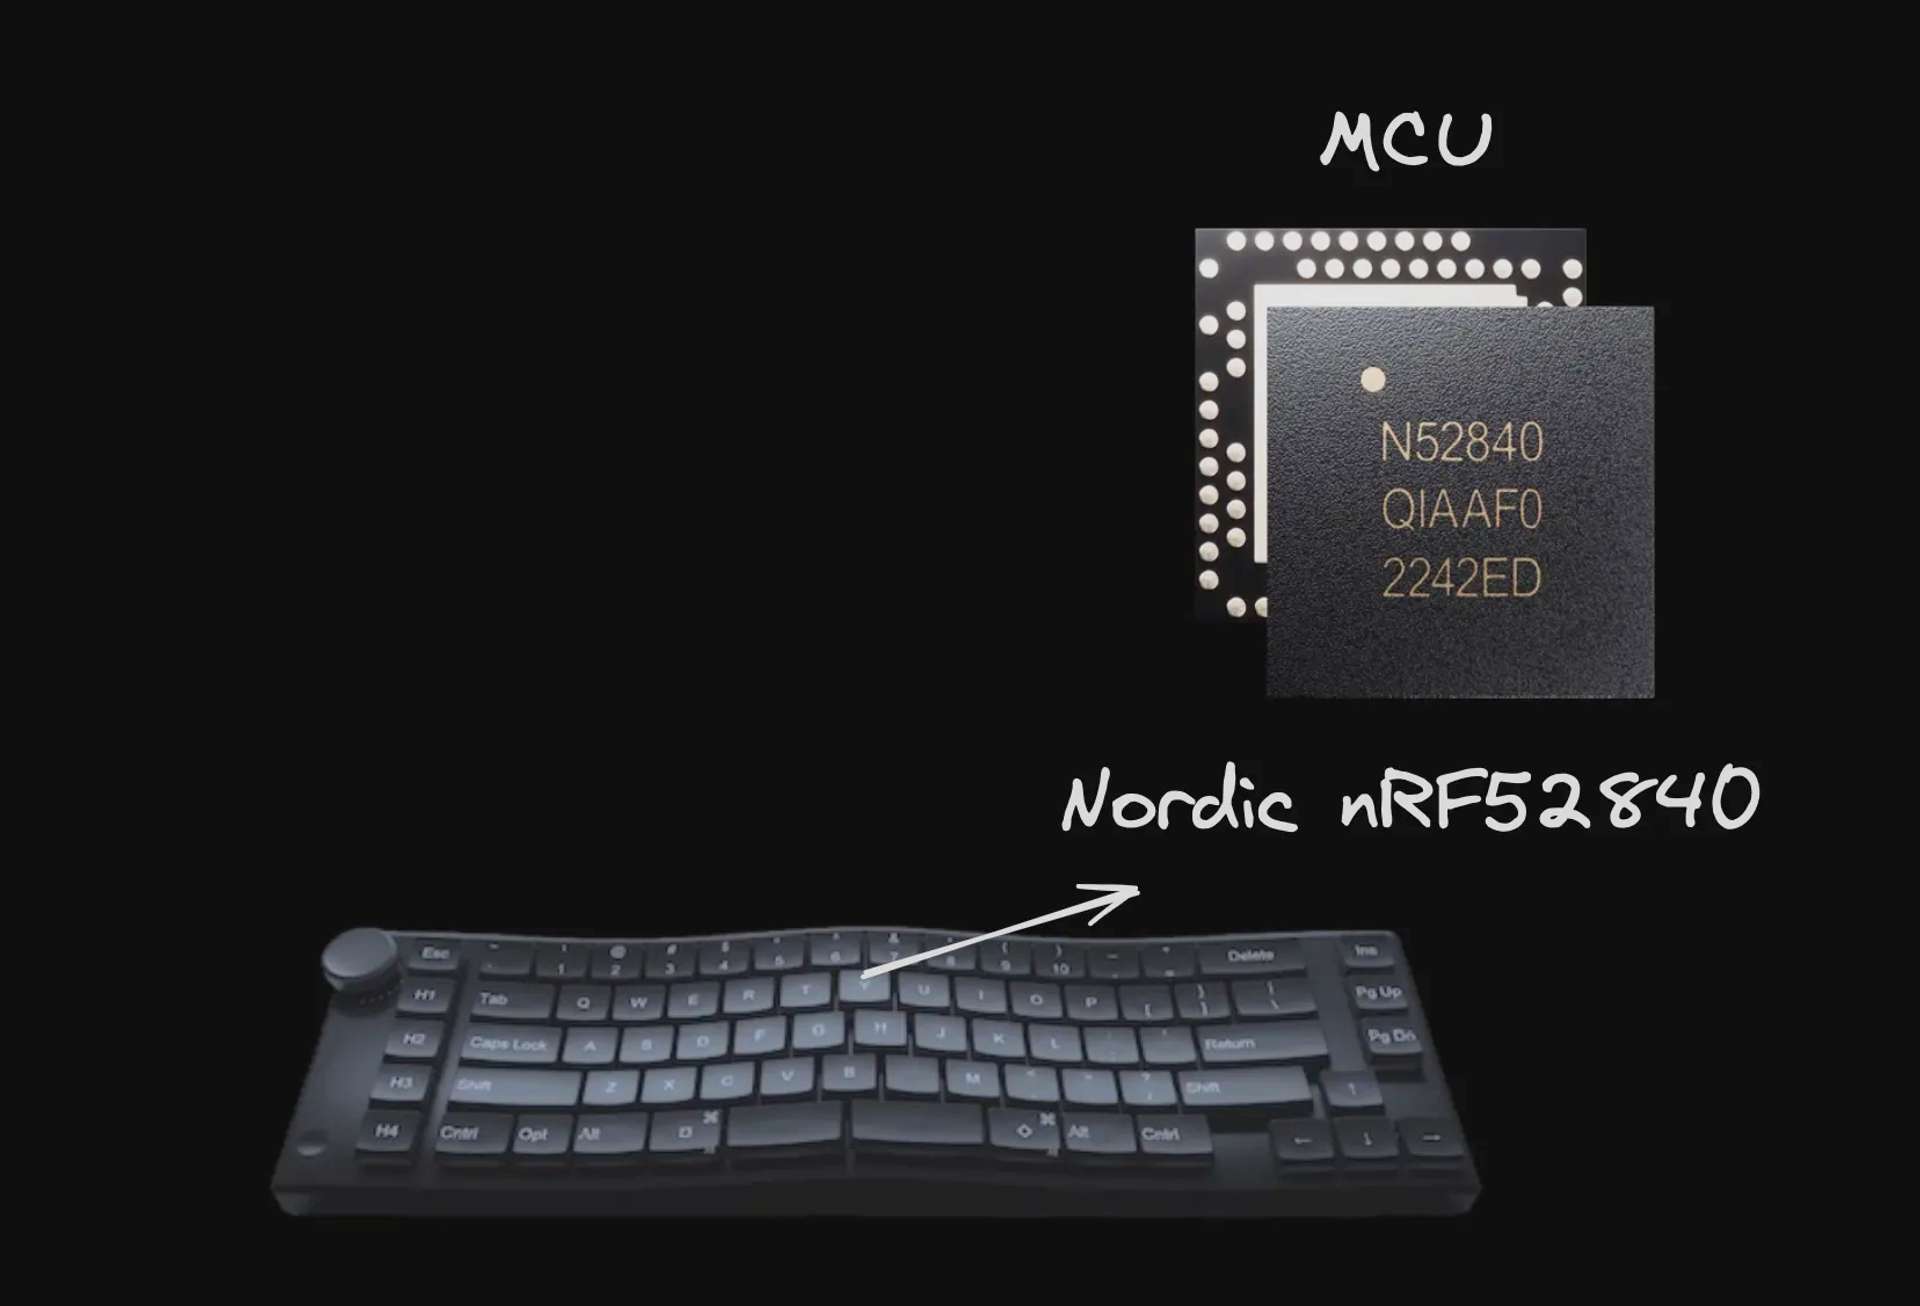
In simple terms, everything we communicate from the configurator API is directed to the MCU.
The keyboard's microcontroller takes in the input from the keys, processes the key presses, and communicates this information to the computer or device it's connected to.
Enabling Web Capabilities
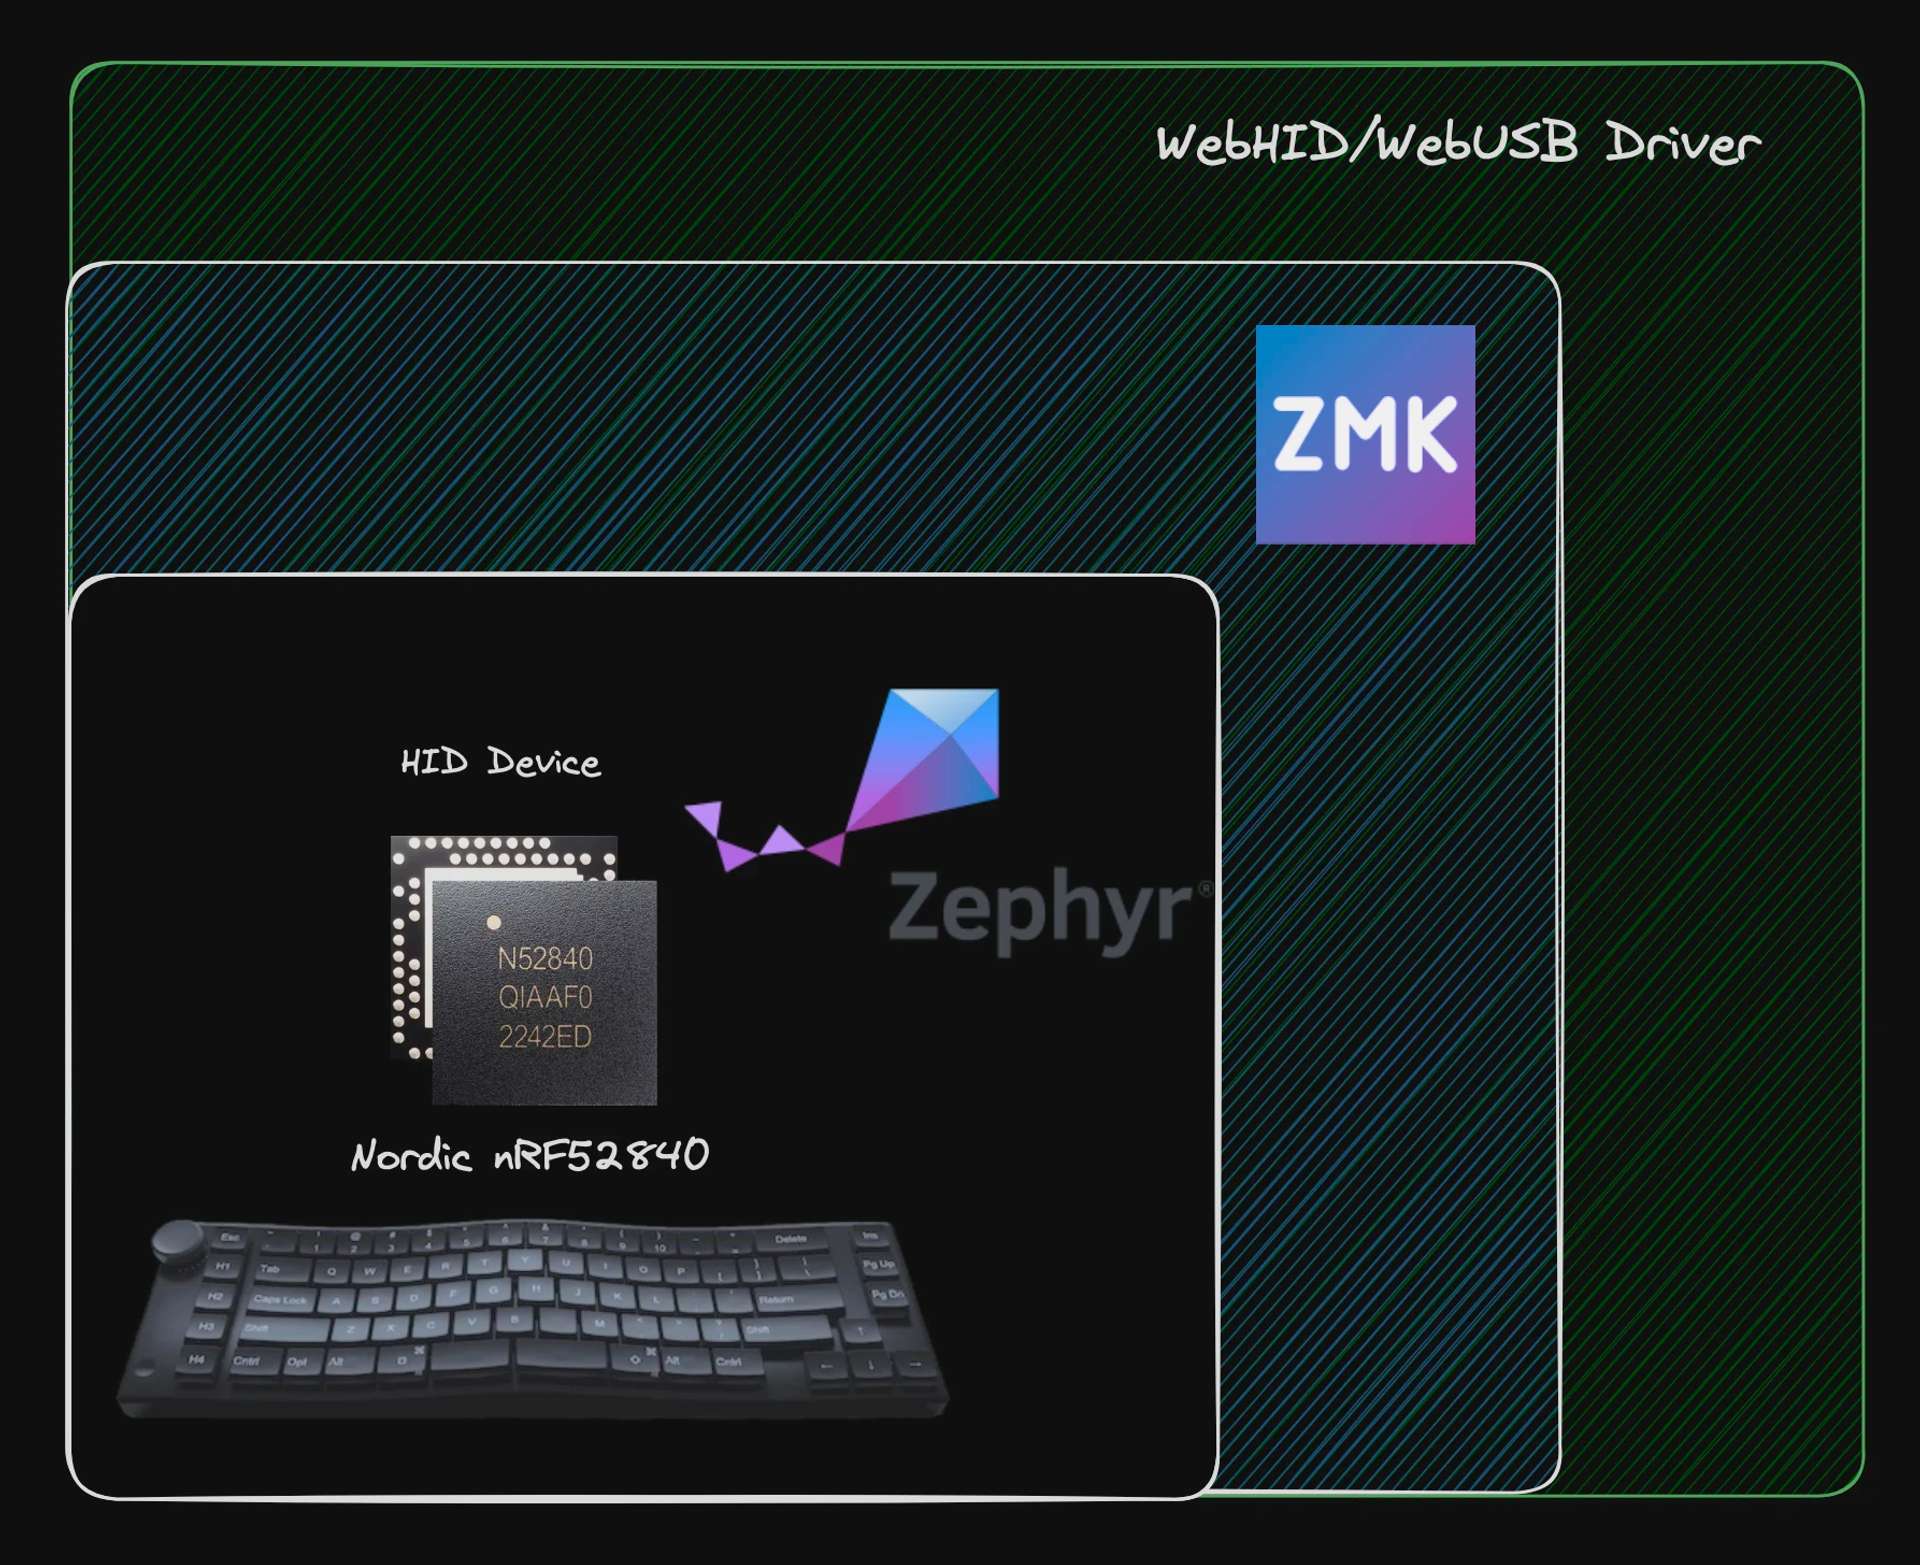
When it comes to developing our keyboard MCU firmware, we used Zephyr RTOS, a real-time operating system (RTOS) that's designed for embedded systems.
In developing our keyboard MCU firmware, we used a powerful and scalable real-time operating system designed for embedded systems.
We built upon this foundation with ZMK, a keyboard-specific framework that extends Zephyr's capabilities.
Our proprietary technology, developed on top of ZMK, adds functionalities like encoder support and the ability to run USB Device Firmware Upgrade Protocol, or DFU, using Web APIs.
Building on our earlier discussion about the HID Protocol, it's important to note that both USB Device Firmware Upgrade (DFU) and USB Human Interface Device (HID) are protocols within the USB specification, each serving its own unique purpose.
Conceptually, you can visually represent the firmware tech stack this:
--
For web developers, a helpful analogy for understanding how the firmware works is the relationship between Node.js and Express.js:
| Web Development | Embedded Firmware |
|---|---|
| Node.js (Underlying environment) | Zephyr (Underlying RTOS) |
| Express.js (Web application framework) | ZMK (Keyboard-specific framework) |
| Express Middleware (Specific task handler) | WebHID/WebUSB driver (Specific task handler), Priorietary Features |
Node.js, like Zephyr in our context, serves as the underlying environment. Express.js, a web application framework built on top of Node.js, adds additional functionality and simplifies development, much like ZMK does for us.
WebHID vs. WebUSB
WebHID[^5] and WebUSB[^6] are two powerful APIs that allow web applications to interact with hardware devices when supported. While they both serve the purpose of enabling communication between web apps and hardware, they have different use cases and capabilities.
Let's dive into the differences between these two APIs and understand why you might choose one over the other. We needed to use both for the keyboard configurator.
--
WebHID, or Web Human Interface Devices, which no one ever refers to it by, is an API that provides a way for web applications to interact with devices that use the HID protocol we discussed earlier.
The main advantage of WebHID is its simplicity.
It provides a high-level interface for interacting with HID devices, abstracting away many of the complexities of the underlying protocol.
--
WebUSB, on the other hand, is a more general-purpose API that provides web applications with access to USB devices.
Unlike WebHID, which is designed specifically for HID devices, WebUSB can be used with any device that uses the USB Protocol.
With WebUSB, you gain direct access to the USB protocol, which empowers you to execute low-level operations.
This includes interacting with the bootloader of a device, such as uploading a.binfile.
For the Hakkei Configurator, this allowed us to perform Device Firmware Updates (DFU) straight from your browser!
But let's clarify this further with a web developer analogy:
WebHID is like using a pre-built Content Management System (CMS) like WordPress.
It's designed for a specific purpose (managing content), and it provides a high-level, user-friendly interface for that purpose. It's great if what you need aligns with what it's designed to do. But if you need to do something outside of its design, like creating a complex, custom web application, you'll find its limitations.
WebUSB, on the other hand, is like coding a website from scratch using HTML, CSS, and JavaScript. It's more complex and requires a deeper understanding of the underlying technologies, but it's also much more flexible.
--
This table summarizes key differences between the two:
| Feature | WebHID | WebUSB |
|---|---|---|
| Protocol | Human Interface Devices (HID) | Universal Serial Bus (USB) |
| Device Compatibility | Works specifically with HID devices like keyboards, mice, and game controllers | Works with any device that uses the USB protocol |
| Interface | High-level, abstracts away many complexities of the HID protocol | Low-level, provides direct access to the USB protocol |
| Use Cases | Ideal for applications that need to interact with standard input devices | Ideal for applications that require advanced operations and control over the device |
| Complexity | Simpler to use due to its high-level interface | More complex due to direct access to the USB protocol |
| Flexibility | Less flexible, designed specifically for HID devices | More flexible, can be used with any USB device |
HID Transport Layer
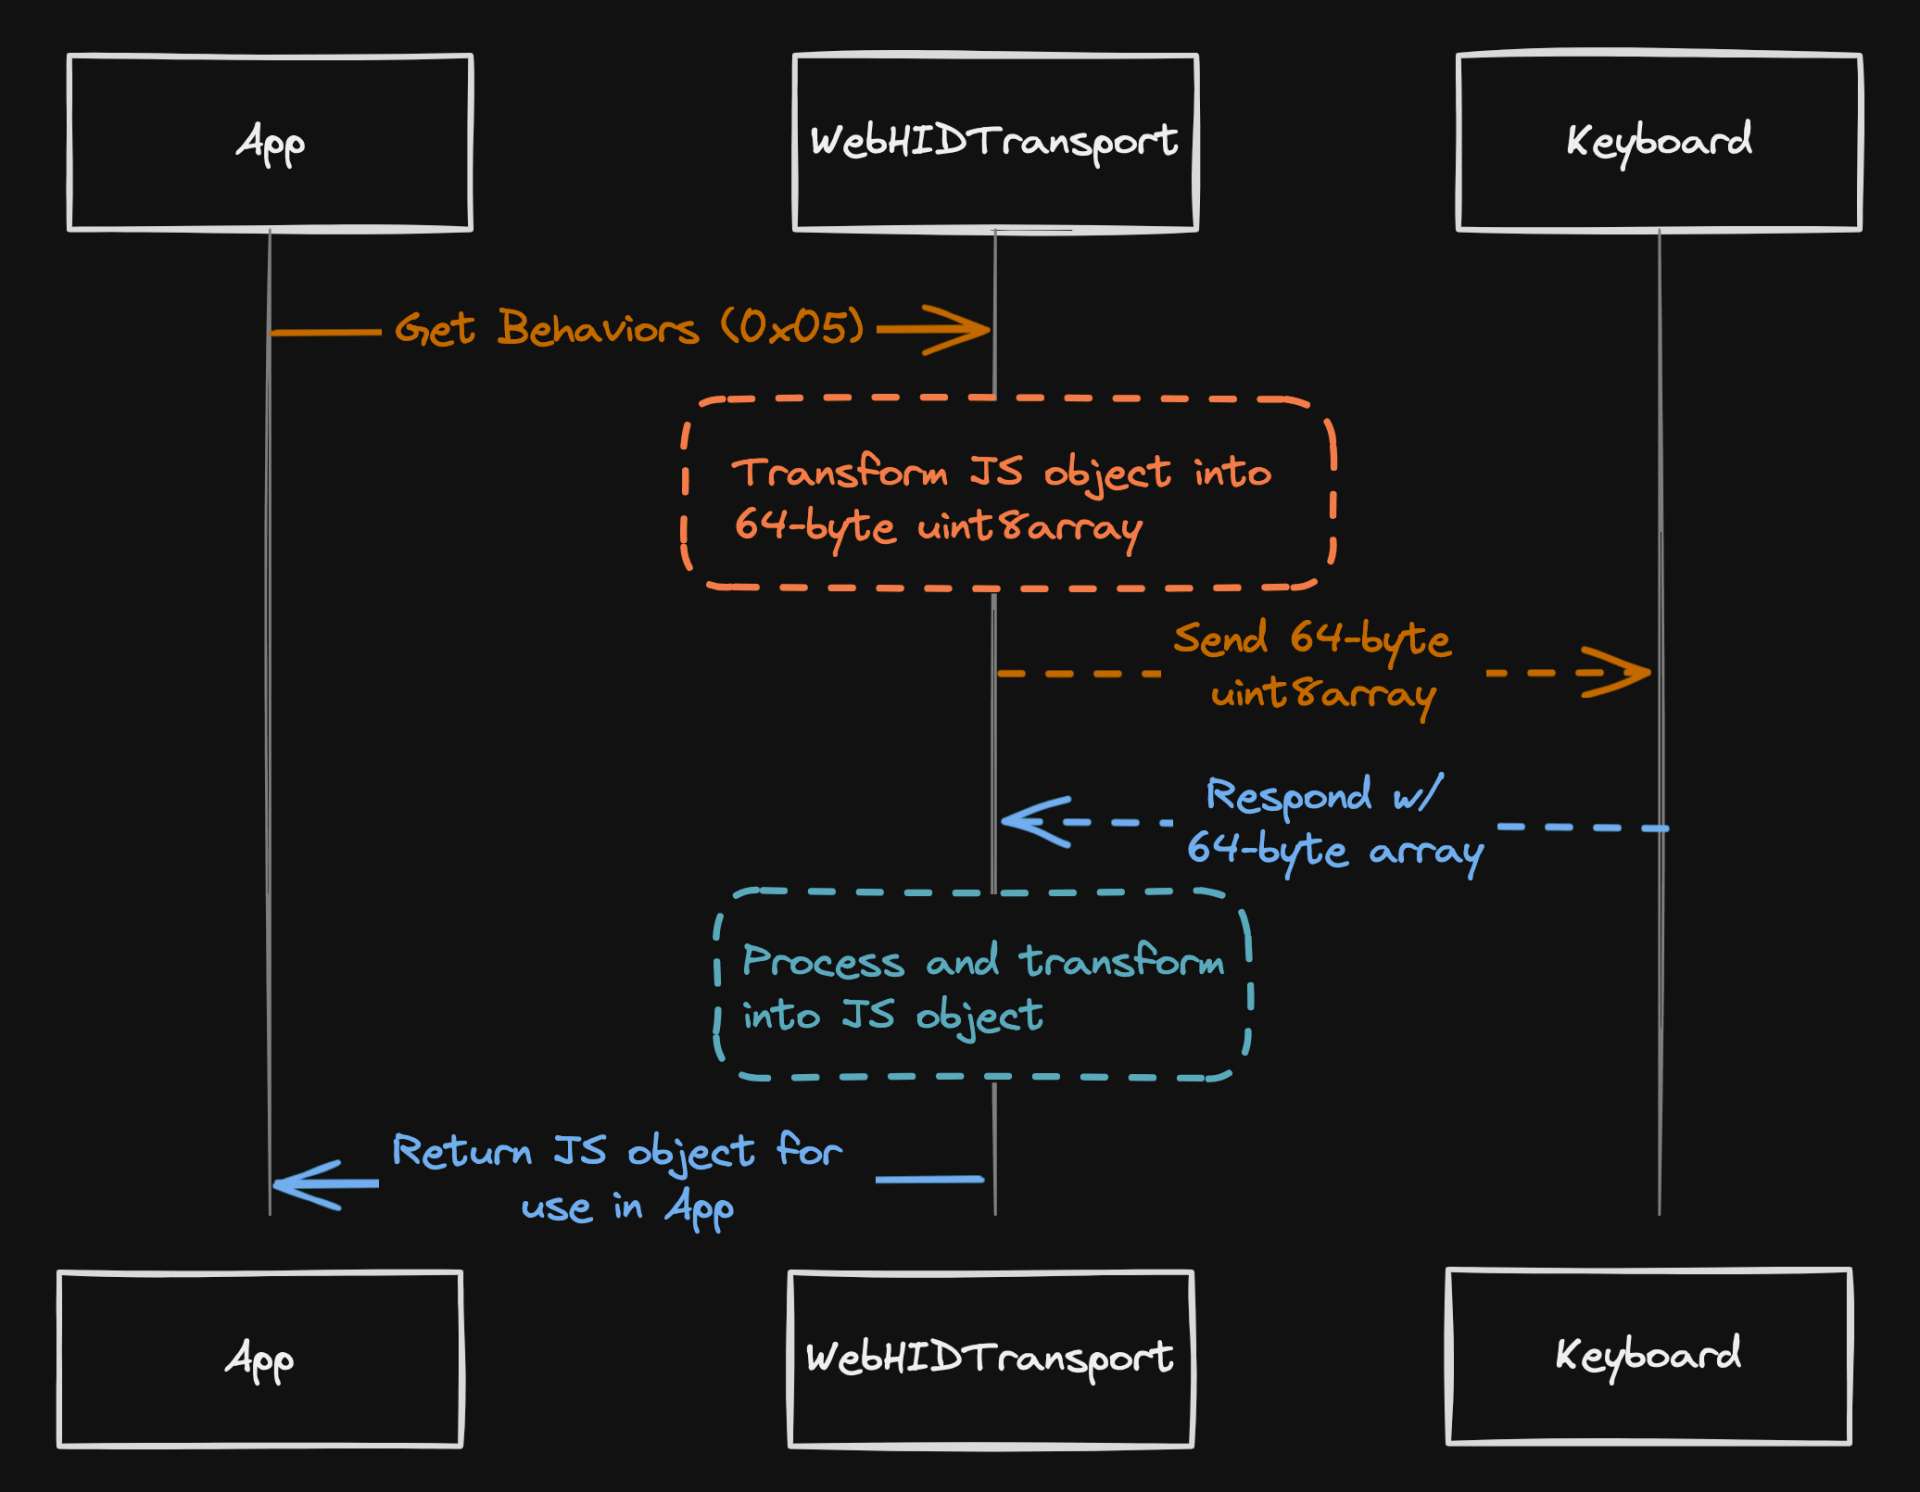
Let's delve into the process of how data is exchanged between the configurator interface and the keyboard.
First, we need a communication channel. In our application, we've built the WebHIDTransport interface to serve this purpose.
WebHIDTransport uses the HID Protocol to enable data exchange between the web application and the keyboard. It's like a translator, proficient in the languages of both the web application and the keyboard.
class TransportWebHID extends Transport {
device: HIDDevice
packetSize = 64
reportId = 0x00
declare vendorId: Number
inputreport = new InputReport()
handler: CommandHandler
emitter = null
constructor(device: HIDDevice) {...}
sendReportToDevice(
device: HIDDevice,
arrayBuffer: Uint8Array,
_reportId: number = 0): Promise<IResult> {...}
onInputReport = async (e: HIDInputReportEvent, handler: CommandHandler) => {...}
// cont...
}
Next, we have the CommandHandler.
As the name suggests, CommandHandler manages commands. It's the interpreter that understands the dialects of both the web application and the keyboard. It takes commands from the application, translates them into ZMK behaviors - the language the keyboard can comprehend, and vice versa.class CommandHandler {
static RAW_BUFFER_SIZE: number = 64
device: HIDDevice
constructor(device: HIDDevice) {
this.device = device
return this
}
async processCommand(buffer: Uint8Array): Promise<IResult> {
const cmd = buffer[0]
switch (cmd) {
case 1:
return await fetchInterfaceVersionCommand(buffer)
case 3:
return await fetchNumberOfKeysCommand(cmd, buffer)
case 4:
return await fetchLayersCommand(cmd, buffer)
case 5:
return await fetchBehaviorsCommand(cmd, buffer)
case 6:
return await fetchAssignKeyCommand(cmd, buffer)
case 7:
return await fetchKeyCommand(cmd, buffer)
case 8:
return await fetchNumberOfKeymapsCommand(cmd, buffer)
case 9:
return await fetchSetActiveKeymapCommand(cmd, buffer)
case 10:
return await fetchFirmwareVersionCommand(cmd, buffer)
case 11:
return await fetchKeymapsDumpCommand(cmd, buffer)
case 12:
return await fetchGenericCommand(cmd, buffer)
case 13:
return await fetchActiveKeymapCommand(cmd, buffer)
case 15:
return await fetchAllocateMacroCommand(cmd, buffer)
default:
return await fetchGenericCommand(cmd, buffer)
}
}
}
Visually, it looks something like this:
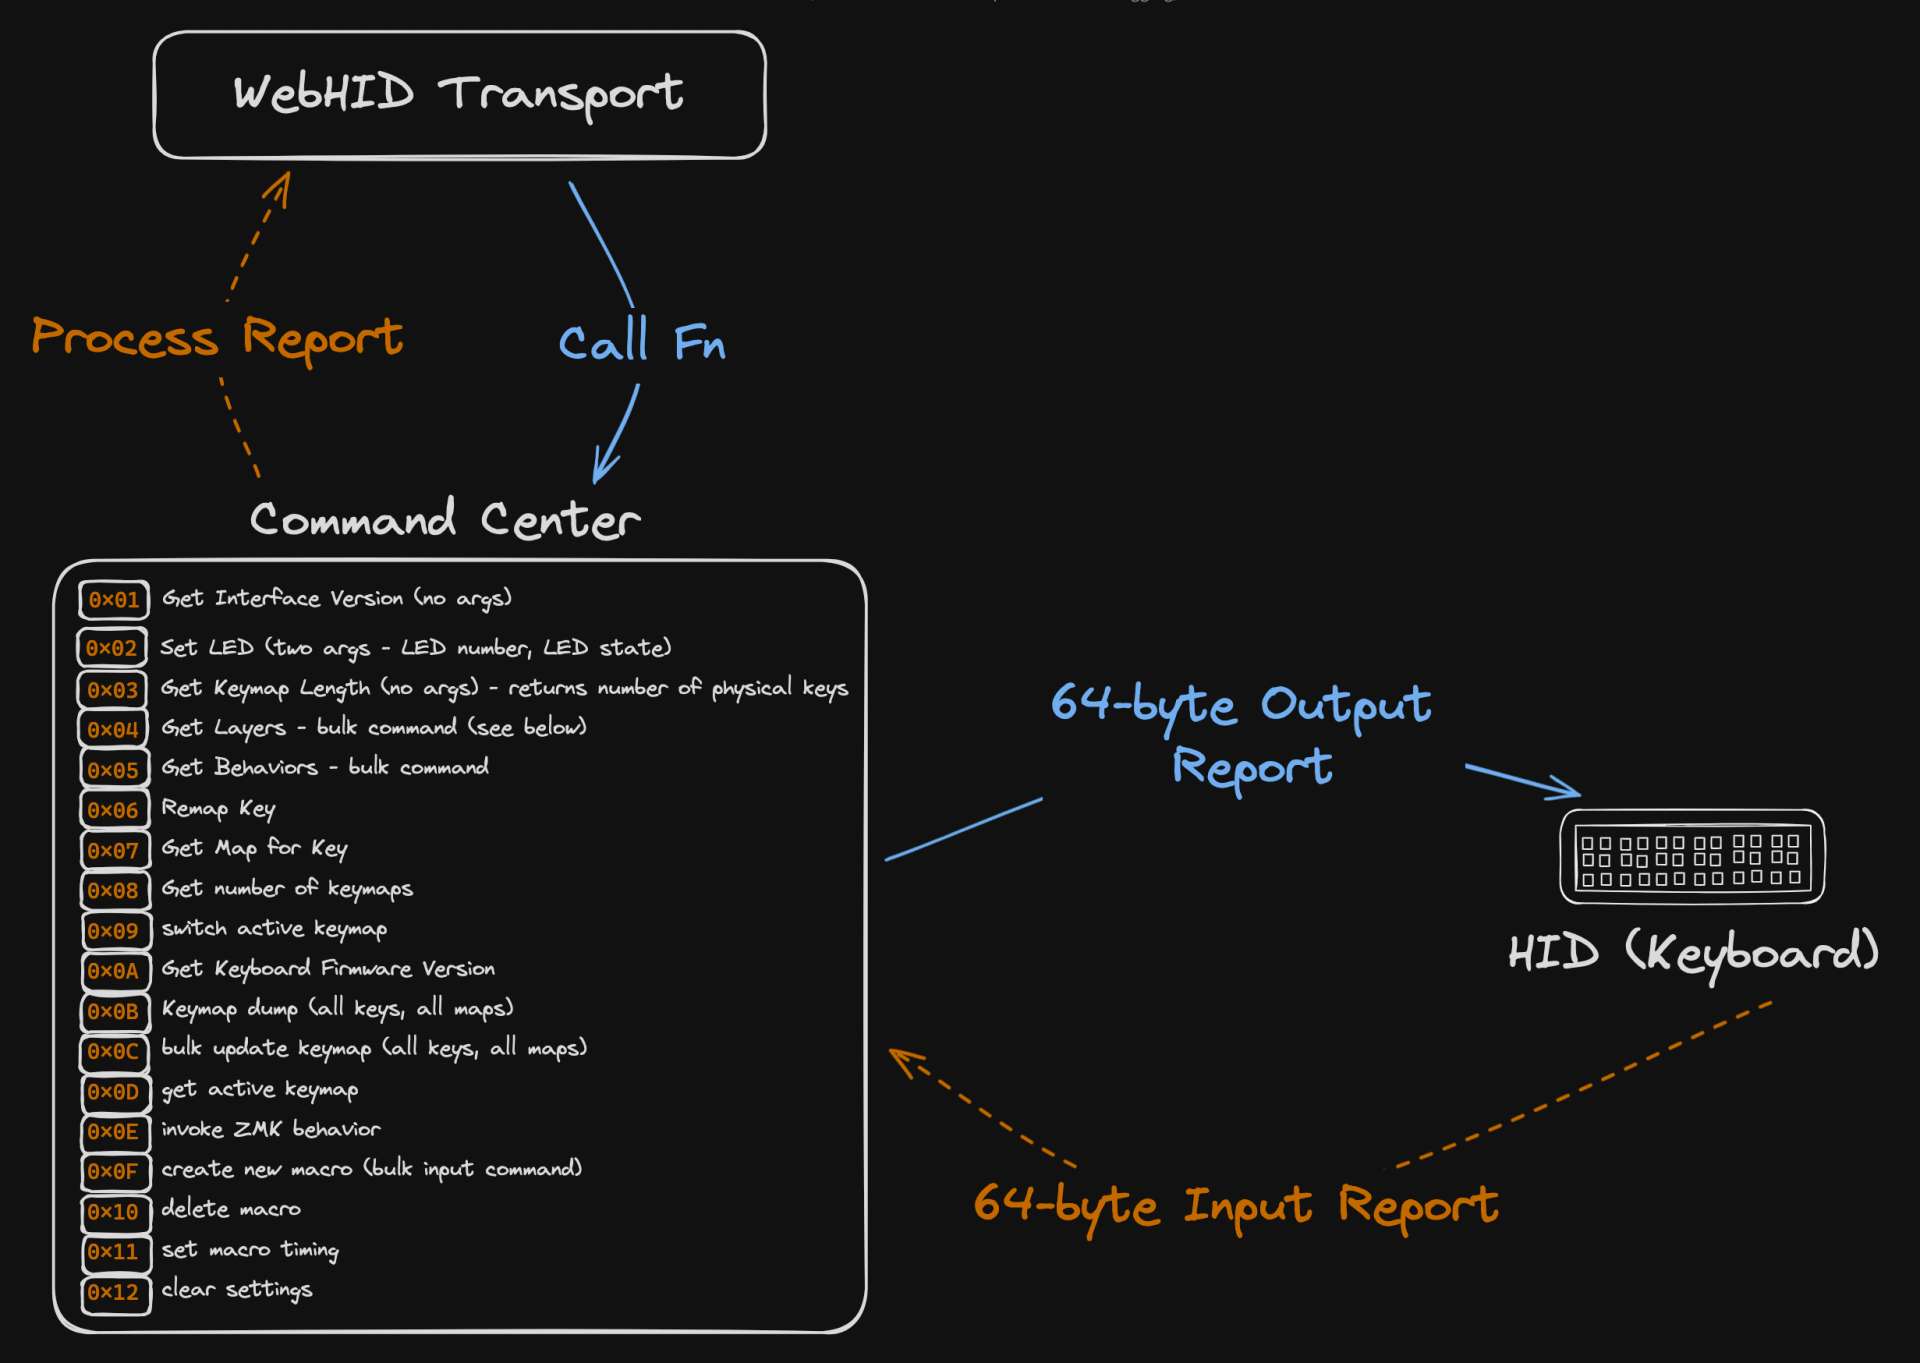
Essentially, WebHIDTransport and CommandHandler act as translators that take the high-level language of the web application and convert it into the low-level language that ZMK can understand.
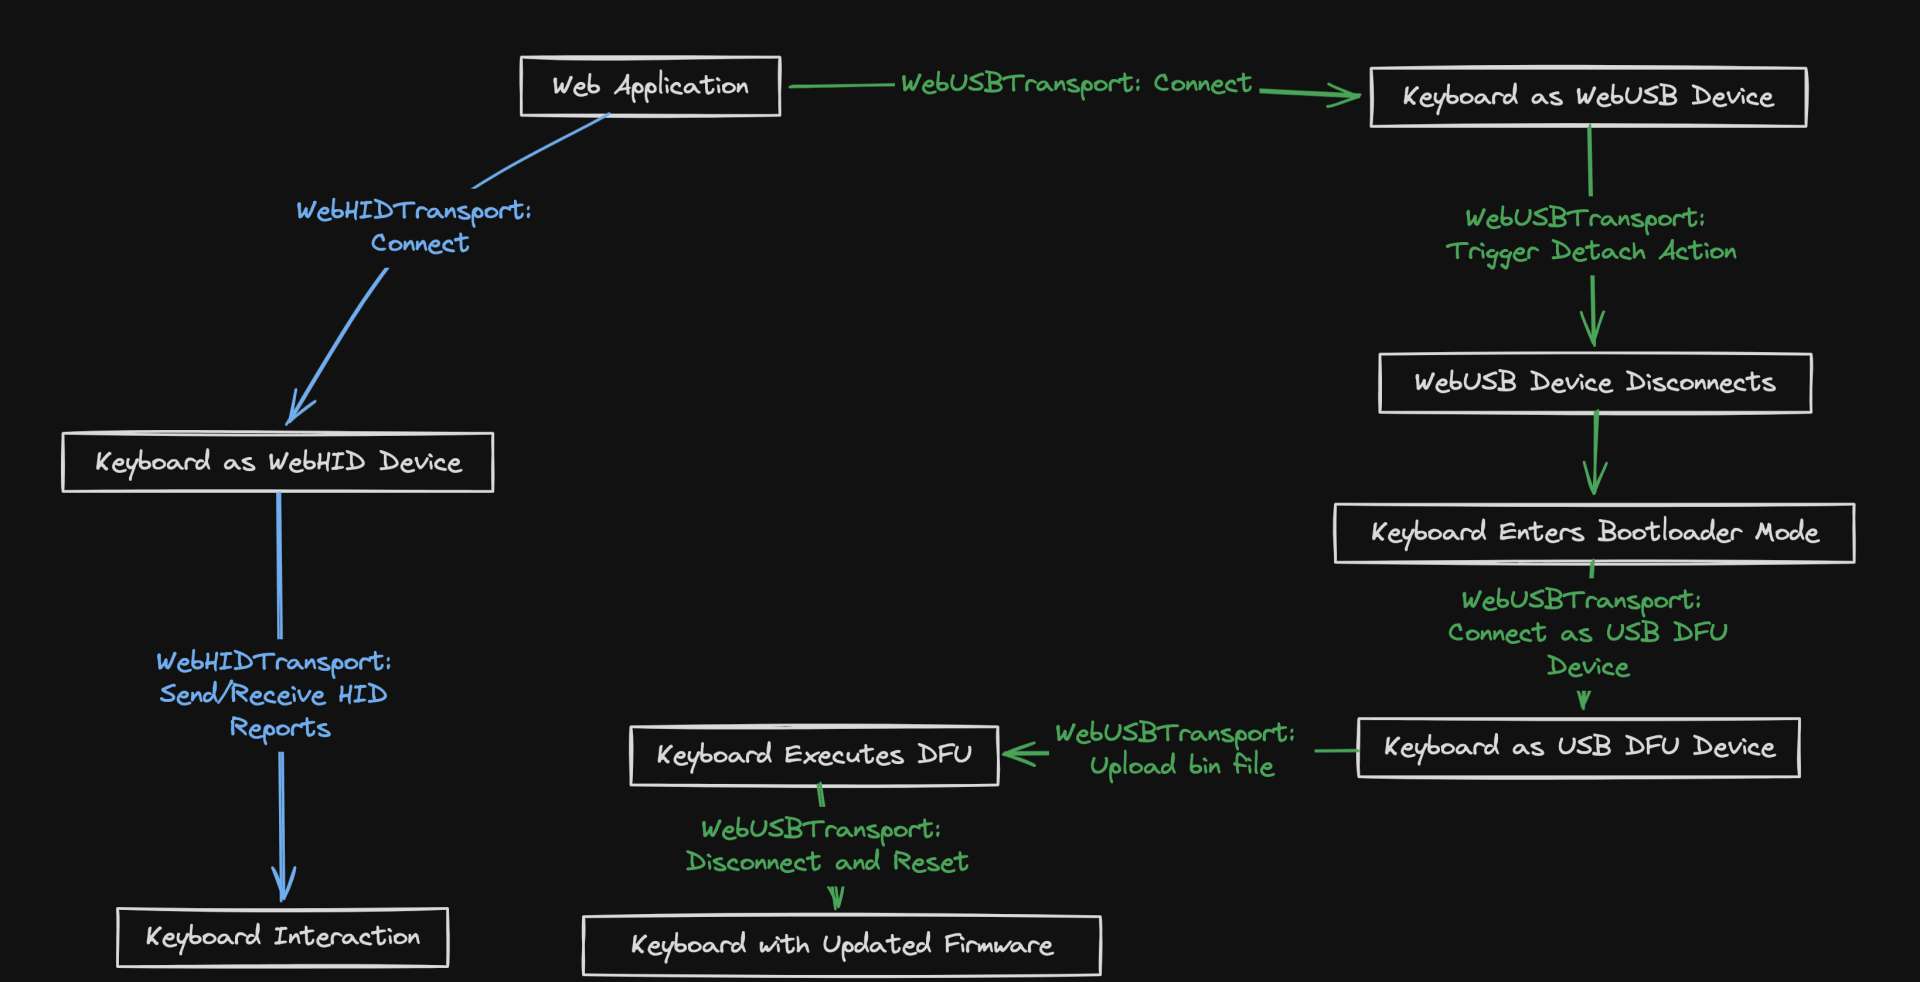
USB DFU Layer
WebHID, while useful for many things, doesn't have the ability to control low-level operations, such as selecting a USB interface. These operations are needed when we want to update the keyboard firmware from the application. That's where WebUSB comes into play.
Now, this is where things get a bit tricky...
Remember how we mentioned earlier that DFU is just another USB protocol, similar to the HID protocol?
Well, when we connect the keyboard using WebUSB, the application treats it as a separate device from the WebHID device.
And here's the kicker: when the keyboard enters DFU mode, it's also treated as a separate device.
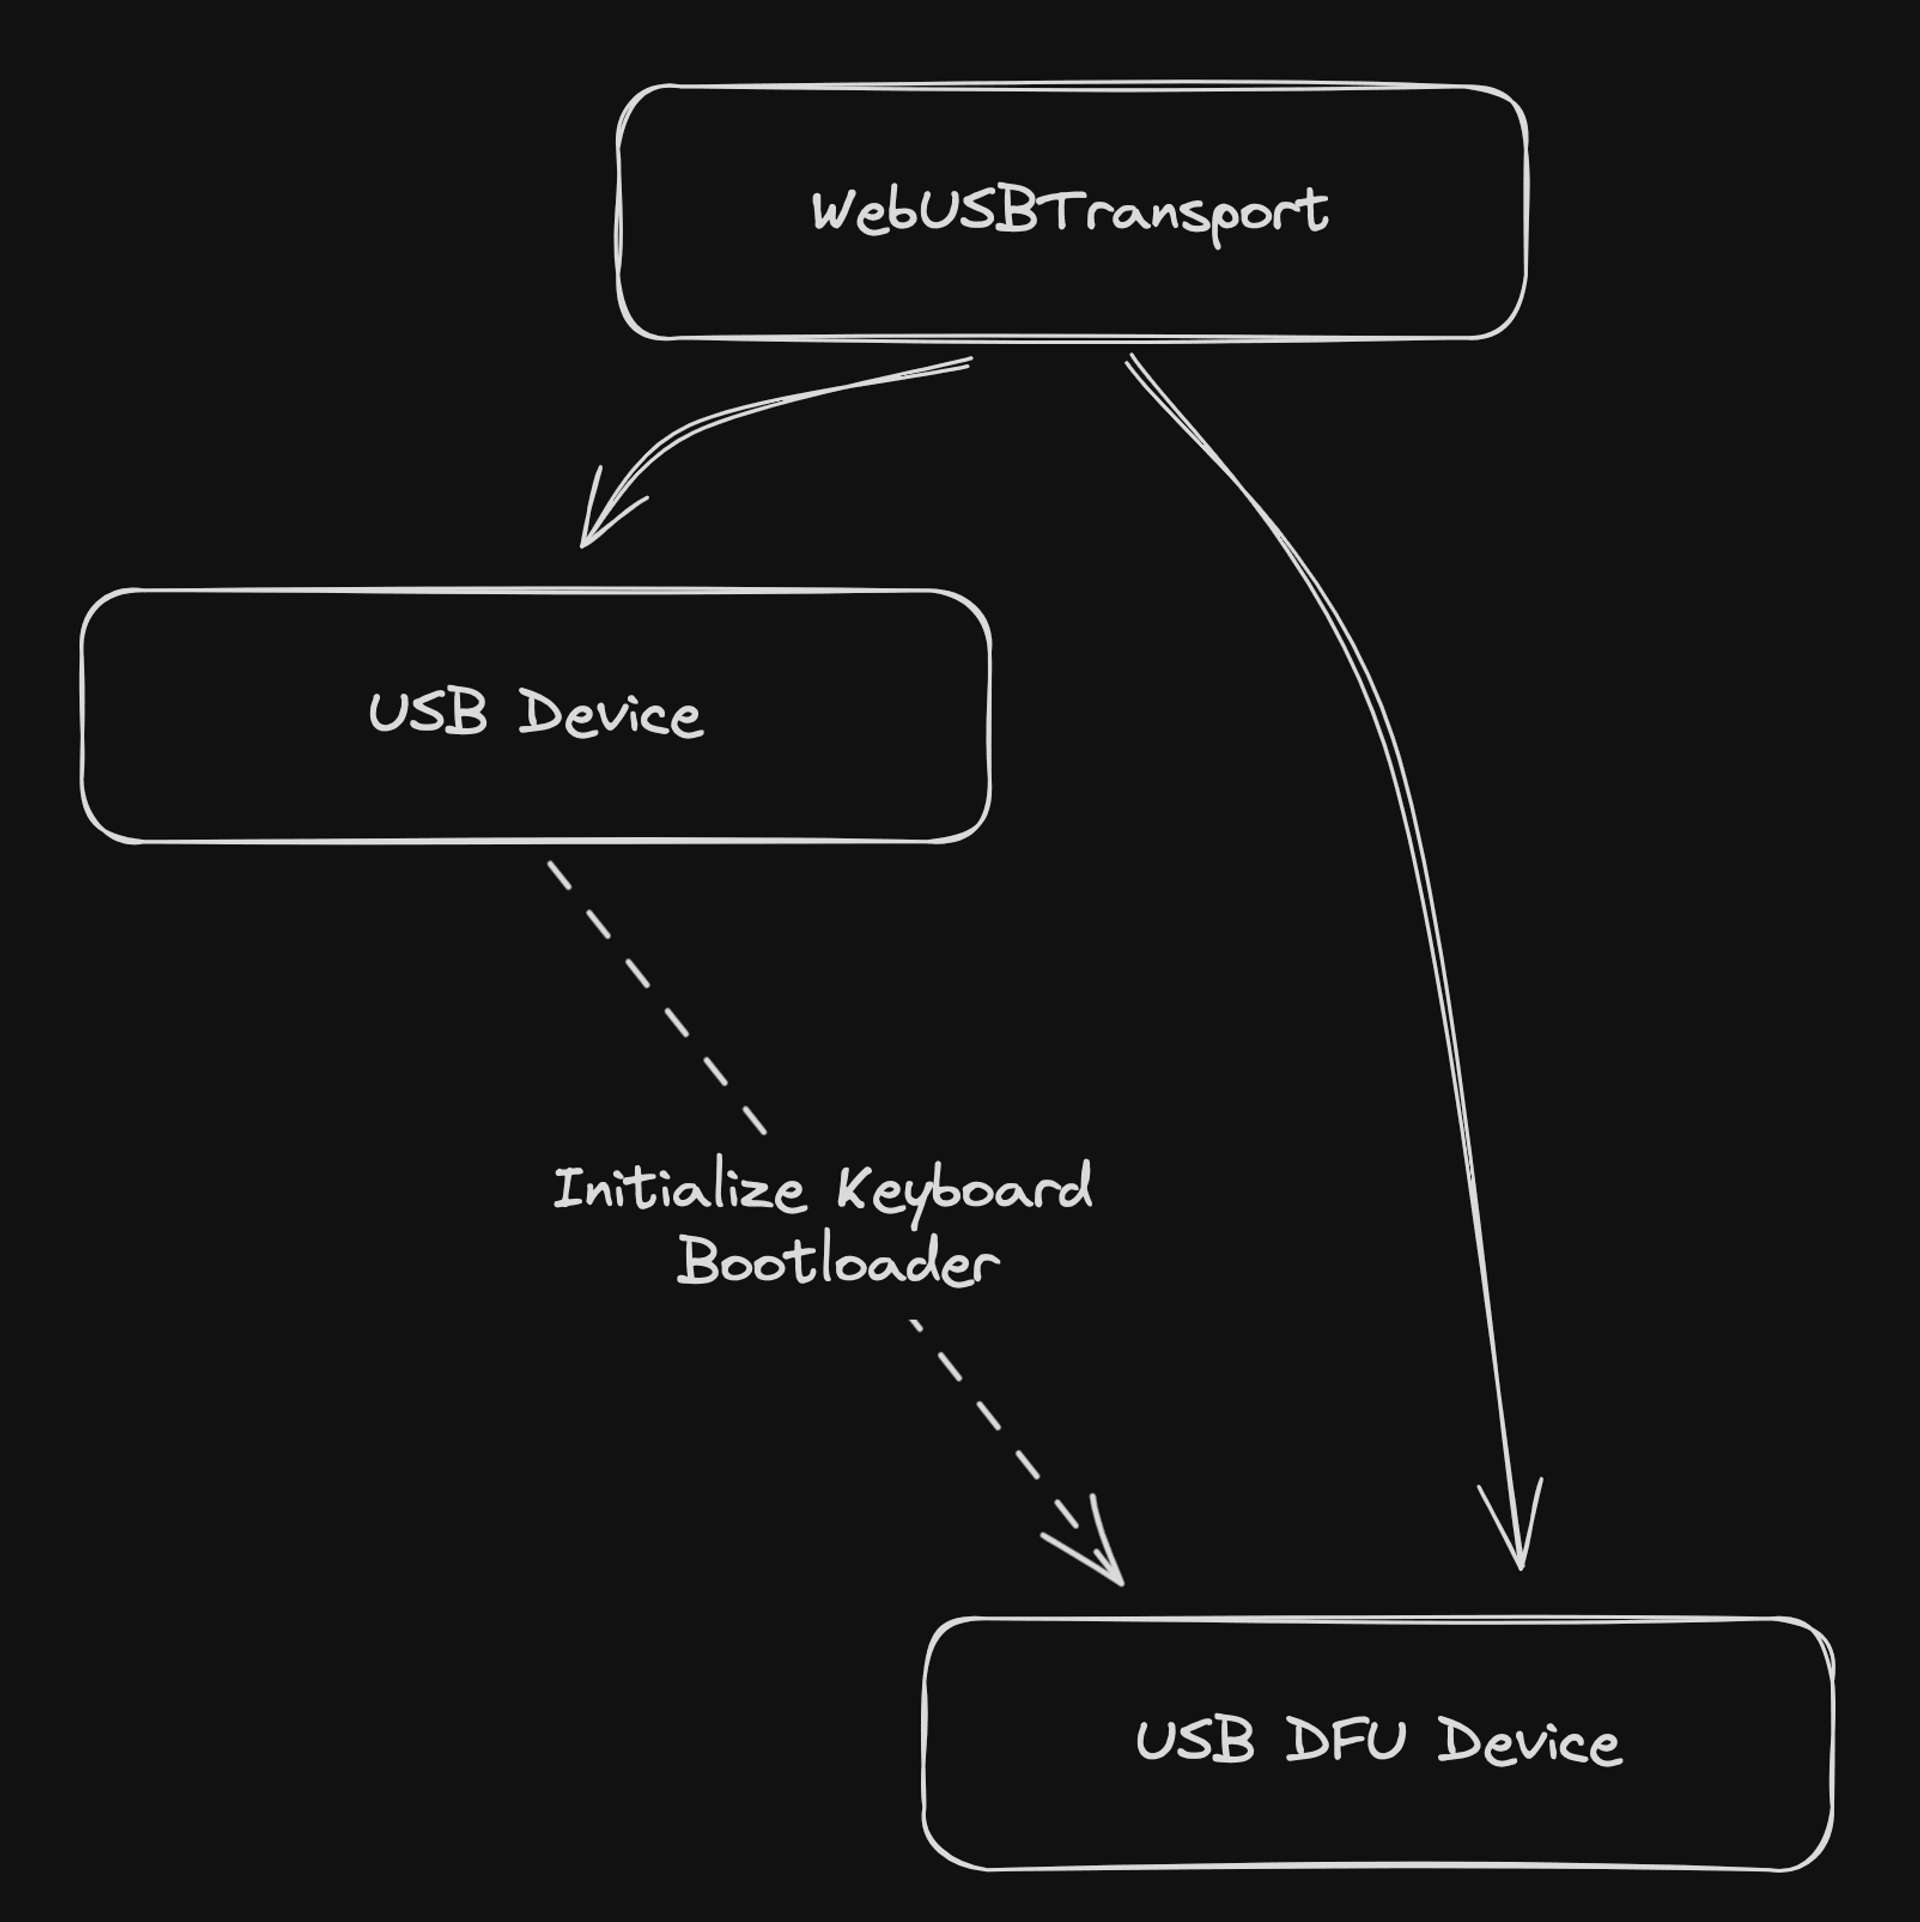
To manage this, we've built the WebUSBTransport interface. This interface handles the two WebUSB protocols needed for the process. Here's a snippet of the WebUSBTransport class:class TransportWebUSB extends Transport {
packetSize = 64
reportId = 0x00
vendorId: Number = 0x1d50
device: USBDevice
webdfu: WebDFU | null = null
manifestationTolerant: boolean = true
detached: boolean = false
interfaceNum: number = 0
interface: any = {}
constructor(device: USBDevice, interfaceNumber: number) {...}
getInterface = () => {
if (this.webdfu instanceof WebDFU) {
return this.webdfu?.device.configurations[0].interfaces[0]
}
return {}
}
connect = async (): Promise<USBDevice> => {...}
onDetach = async () => {...}
resetDevice = async () => {...}
onDownload = async (fileBlob?: File | any, onError?: () => void) => {...}
// cont...
This class manages the connection, detachment, device reset, and firmware download for the keyboard device.
We also have our DFU implementation:
This package is a JavaScript-based implementation of dfu-util, a standardized tool used to download and upload firmware to/from devices connected over USB.
By using WebUSB and our WebUSBTransport interface, we're able to manage the firmware update process for the keyboard.
Summary
To summarize, from the application's perspective, we're dealing with three distinct devices.
HID device with WebHID
USB device with WebUSB
USB DFU device with WebUSB