This article shares what I've learned about installing Node.js on Unix systems, managing Node.js versions, and why this knowledge is important for handling pnpm.
Disclaimer: This document isn't designed to be an exhaustive guide to managing Node environments. Instead, it focuses on explaining the specific roles of different tools used for installing and managing packages across various environments, including global, user-specific, and project-based setups.
Let's first delve into the installation process of Node.js and its version management on Unix systems. Afterwards, we'll discuss how this knowledge can be applied to effectively manage pnpm.
Installing Node
Let's start by discussing how Node is managed at the system level.
via Homebrew
Homebrew is a popular package manager for macOS that simplifies the installation of software. It's often used to install various Unix tools and applications on Macintosh computers.
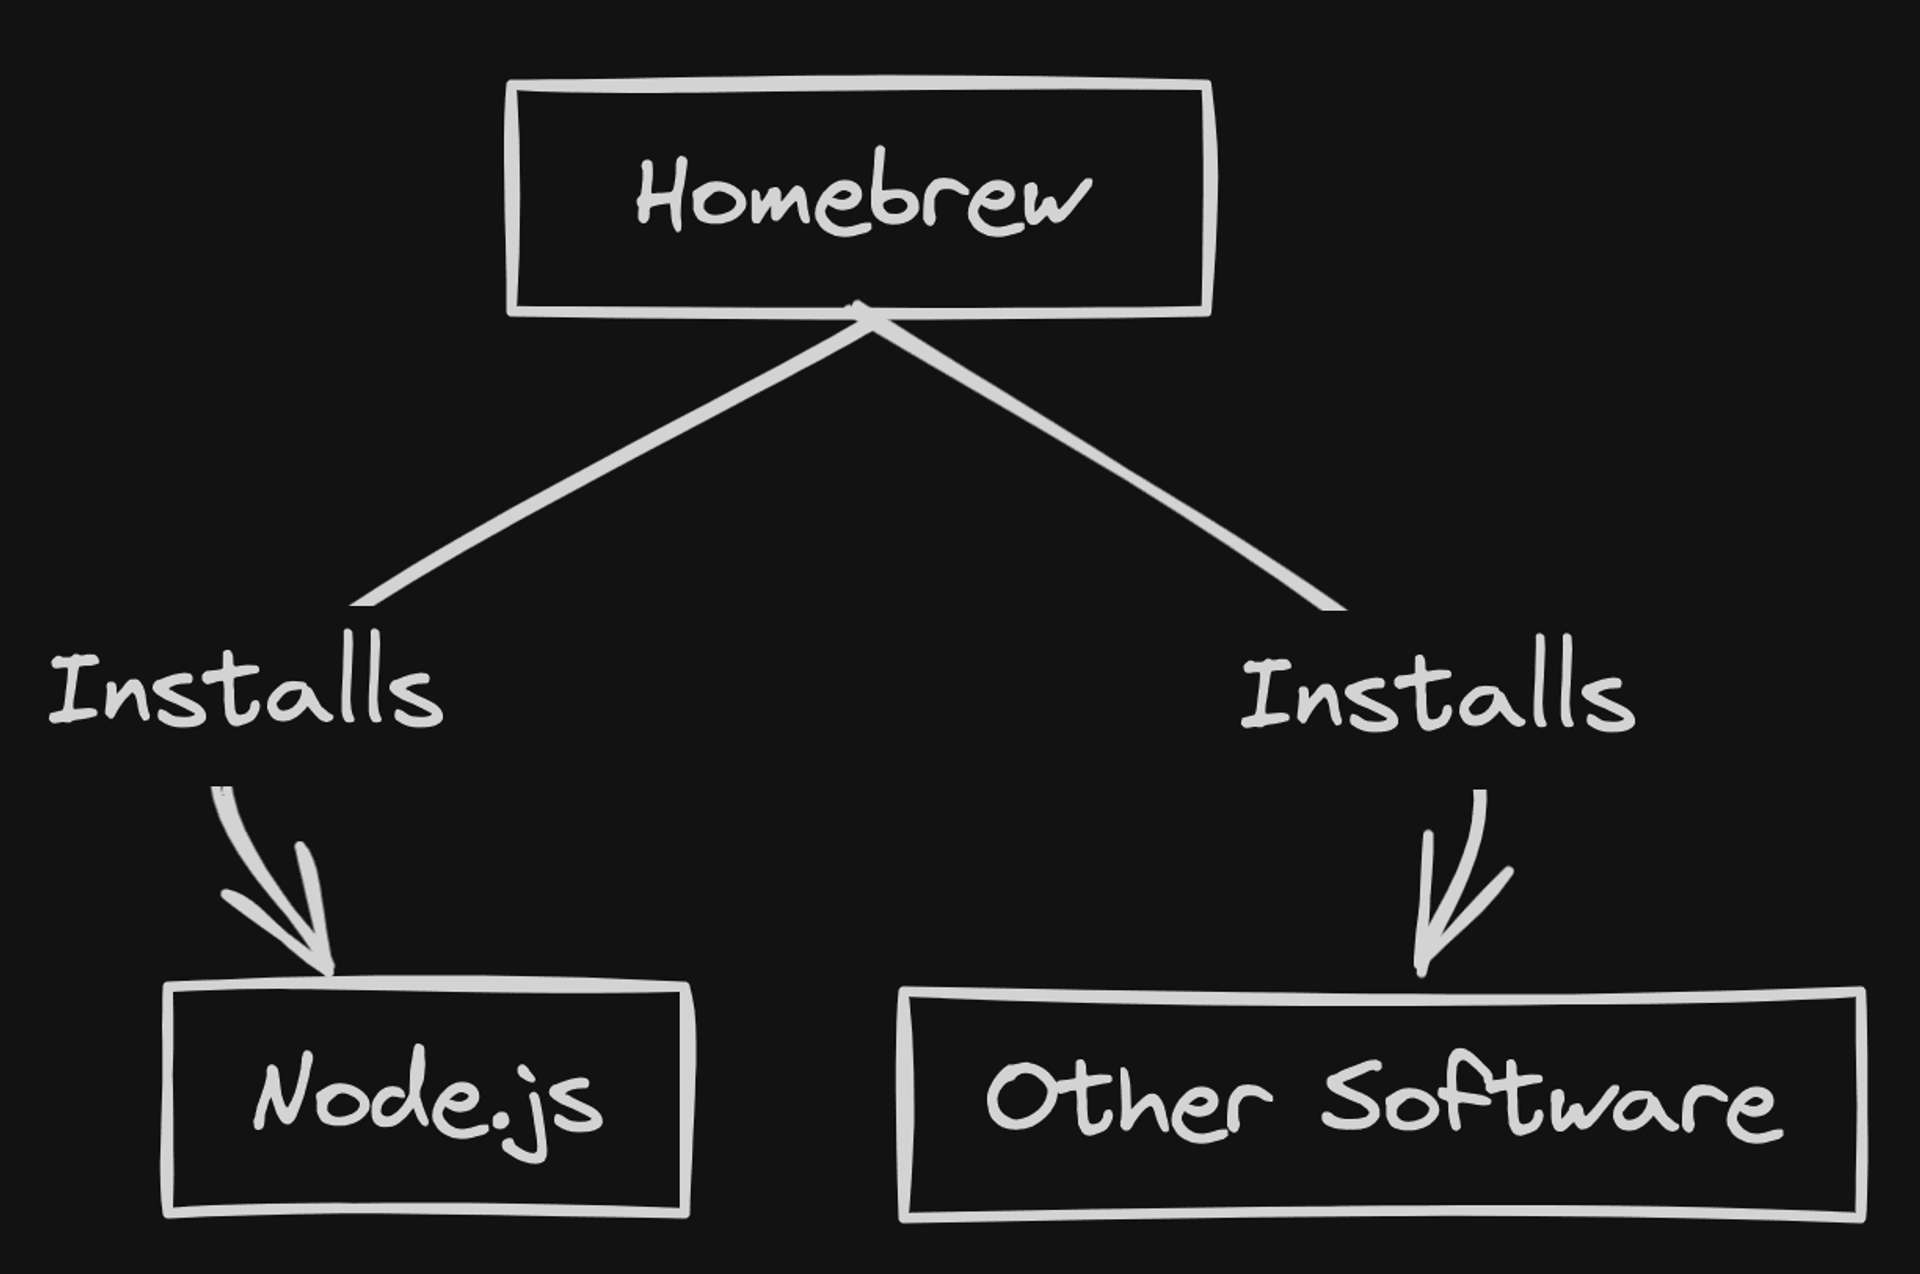
For many developers, when you need to first install Node.js into your system, using brew is the simplest way to do that and it installs npm together.> brew install node
Once Node.js is installed, you can verify the installation of both Node.js and npm by running the following commands in your terminal:> node -v
> npm -v
Note:
Homebrew is not an installation requirement for Node, rather it is a method to install Node.
Homebrew Installation Location
Homebrew's default installation location on Unix-based systems depends on the type of processor your system uses:
| Processor | Homebrew Directory | Executable Files | Package Files | Symbolic Links |
|---|---|---|---|---|
| Intel | /usr/local | /usr/local/bin | /usr/local/Cellar | /usr/local/opt |
| Apple Silicon (M1, M2, etc.) | /opt/homebrew | /opt/homebrew/bin | /opt/homebrew/Cellar | /opt/homebrew/opt |
via NVM
NVM, or Node Version Manager, is a version manager for Node.js, designed to be installed per-user, and invoked per-shell. It allows you to easily install, update and switch between different versions of Node.js.> curl -o- https://raw.githubusercontent.com/nvm-sh/nvm/v0.38.0/install.sh | bash
> nvm install node
NVM Installation Location
By default, the script places the NVM files in a hidden directory named .nvm within your home directory ($HOME). So, the usual location would be $HOME/.nvm.
We'll revisit how Node versions are managed in a later section.
via Binary Distro
You can also download Node.js directly from the official website and install it manually. This method is more hands-on and requires you to manually manage updates and version switching.> Navigate to https://nodejs.org/en/download/
> Download the appropriate binary
> Follow the installation instructions
Default Binary Installation Location
On Unix-based systems, the default installation location for Node.js (when using the official binary installer) typically falls under the directory /usr/local/lib/node_js or /usr/local/bin/node.
Node Version Management
Global and local npm packages are installed in different locations and serve different purposes.
Global Scope
Global packages are installed on your system in a specific directory that is added to your system's PATH. This means you can run the command for a global package from any directory in your terminal.
For Unix-based systems like macOS or Linux, the global packages are usually stored in /usr/local/lib/node_modules.
When you install a package globally using npm i -g <package-name>, npm installs the package in this global directory.
You can view all the global packages you've installed by running:> ls /usr/local/lib/node_modules
Understanding Global Packages
When you install a package globally with npm, it creates a symbolic link in the /usr/local/bin directory (or equivalent on your system). This link points to the package's main executable file. This directory is included in your system's PATH, allowing you to run the command from anywhere in your terminal.
We can visualize this process like this:
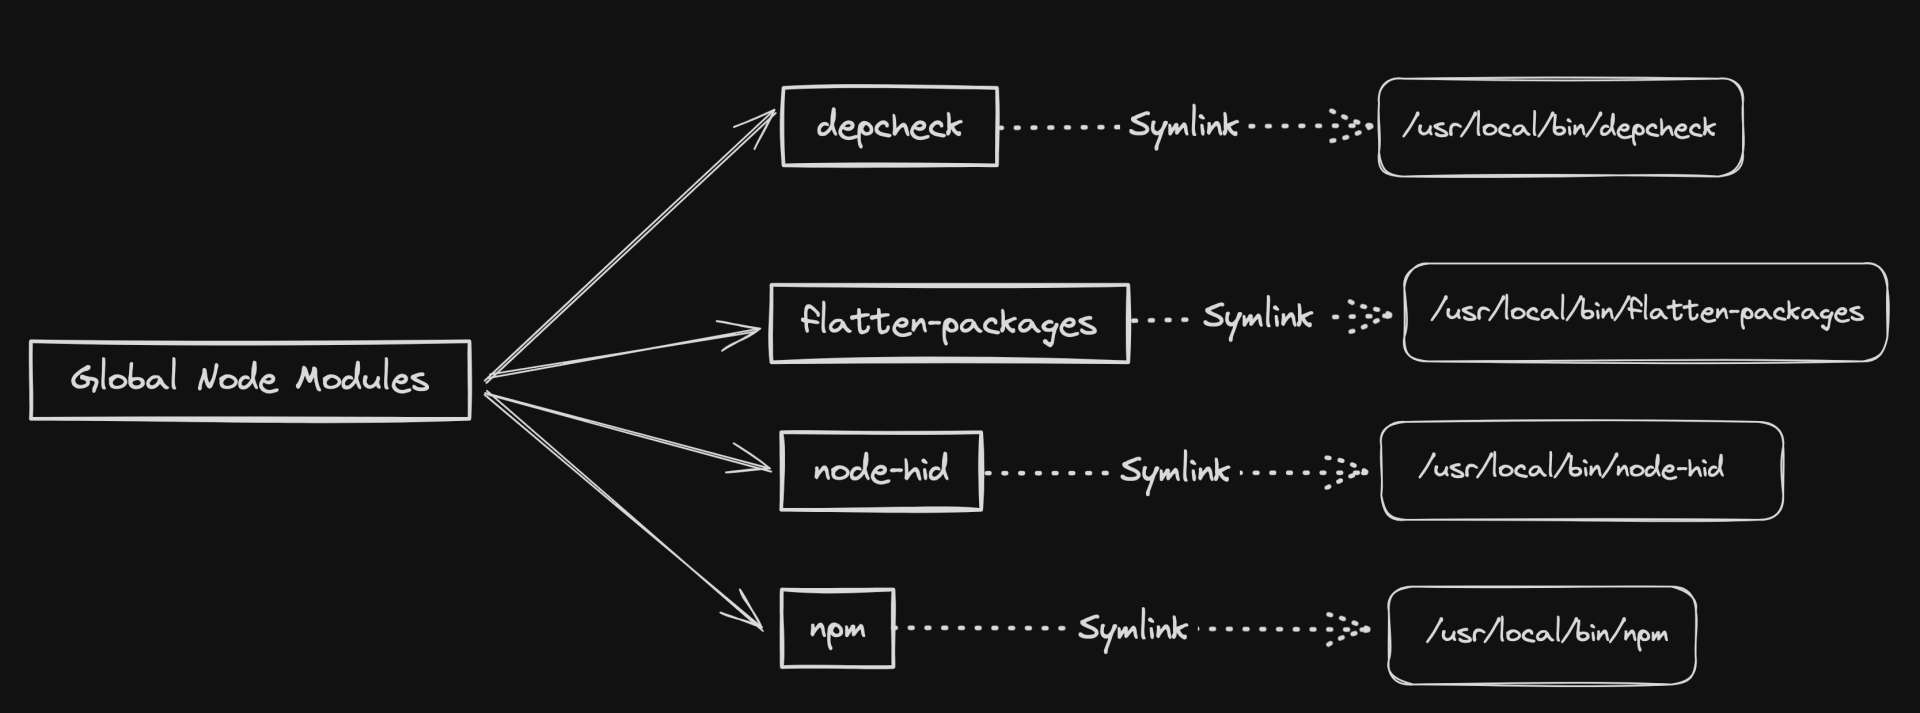
Each global package in the /usr/local/lib/node_modules directory has a corresponding link in the /usr/local/bin directory.
This setup enables you to run the shown binaries directly from the command line, regardless of your current directory:> depcheck
> flatten-packages
> node-hid
> npm
# etc
Per-User & Per-Project Scopes
Per-user and per-project Node.js installations provide a more flexible way to manage Node.js versions. These installations are managed by a version manager like nvm or n.
For instance, consider a scenario where a project specifies a particular Node.js version in its package.json:"engines": {
"node": ">=18"
},
However, your current Node.js version is different:> node -v
v20.11.1
This discrepancy could lead to compatibility issues, as the project may rely on features or behaviors specific to its required Node.js version.
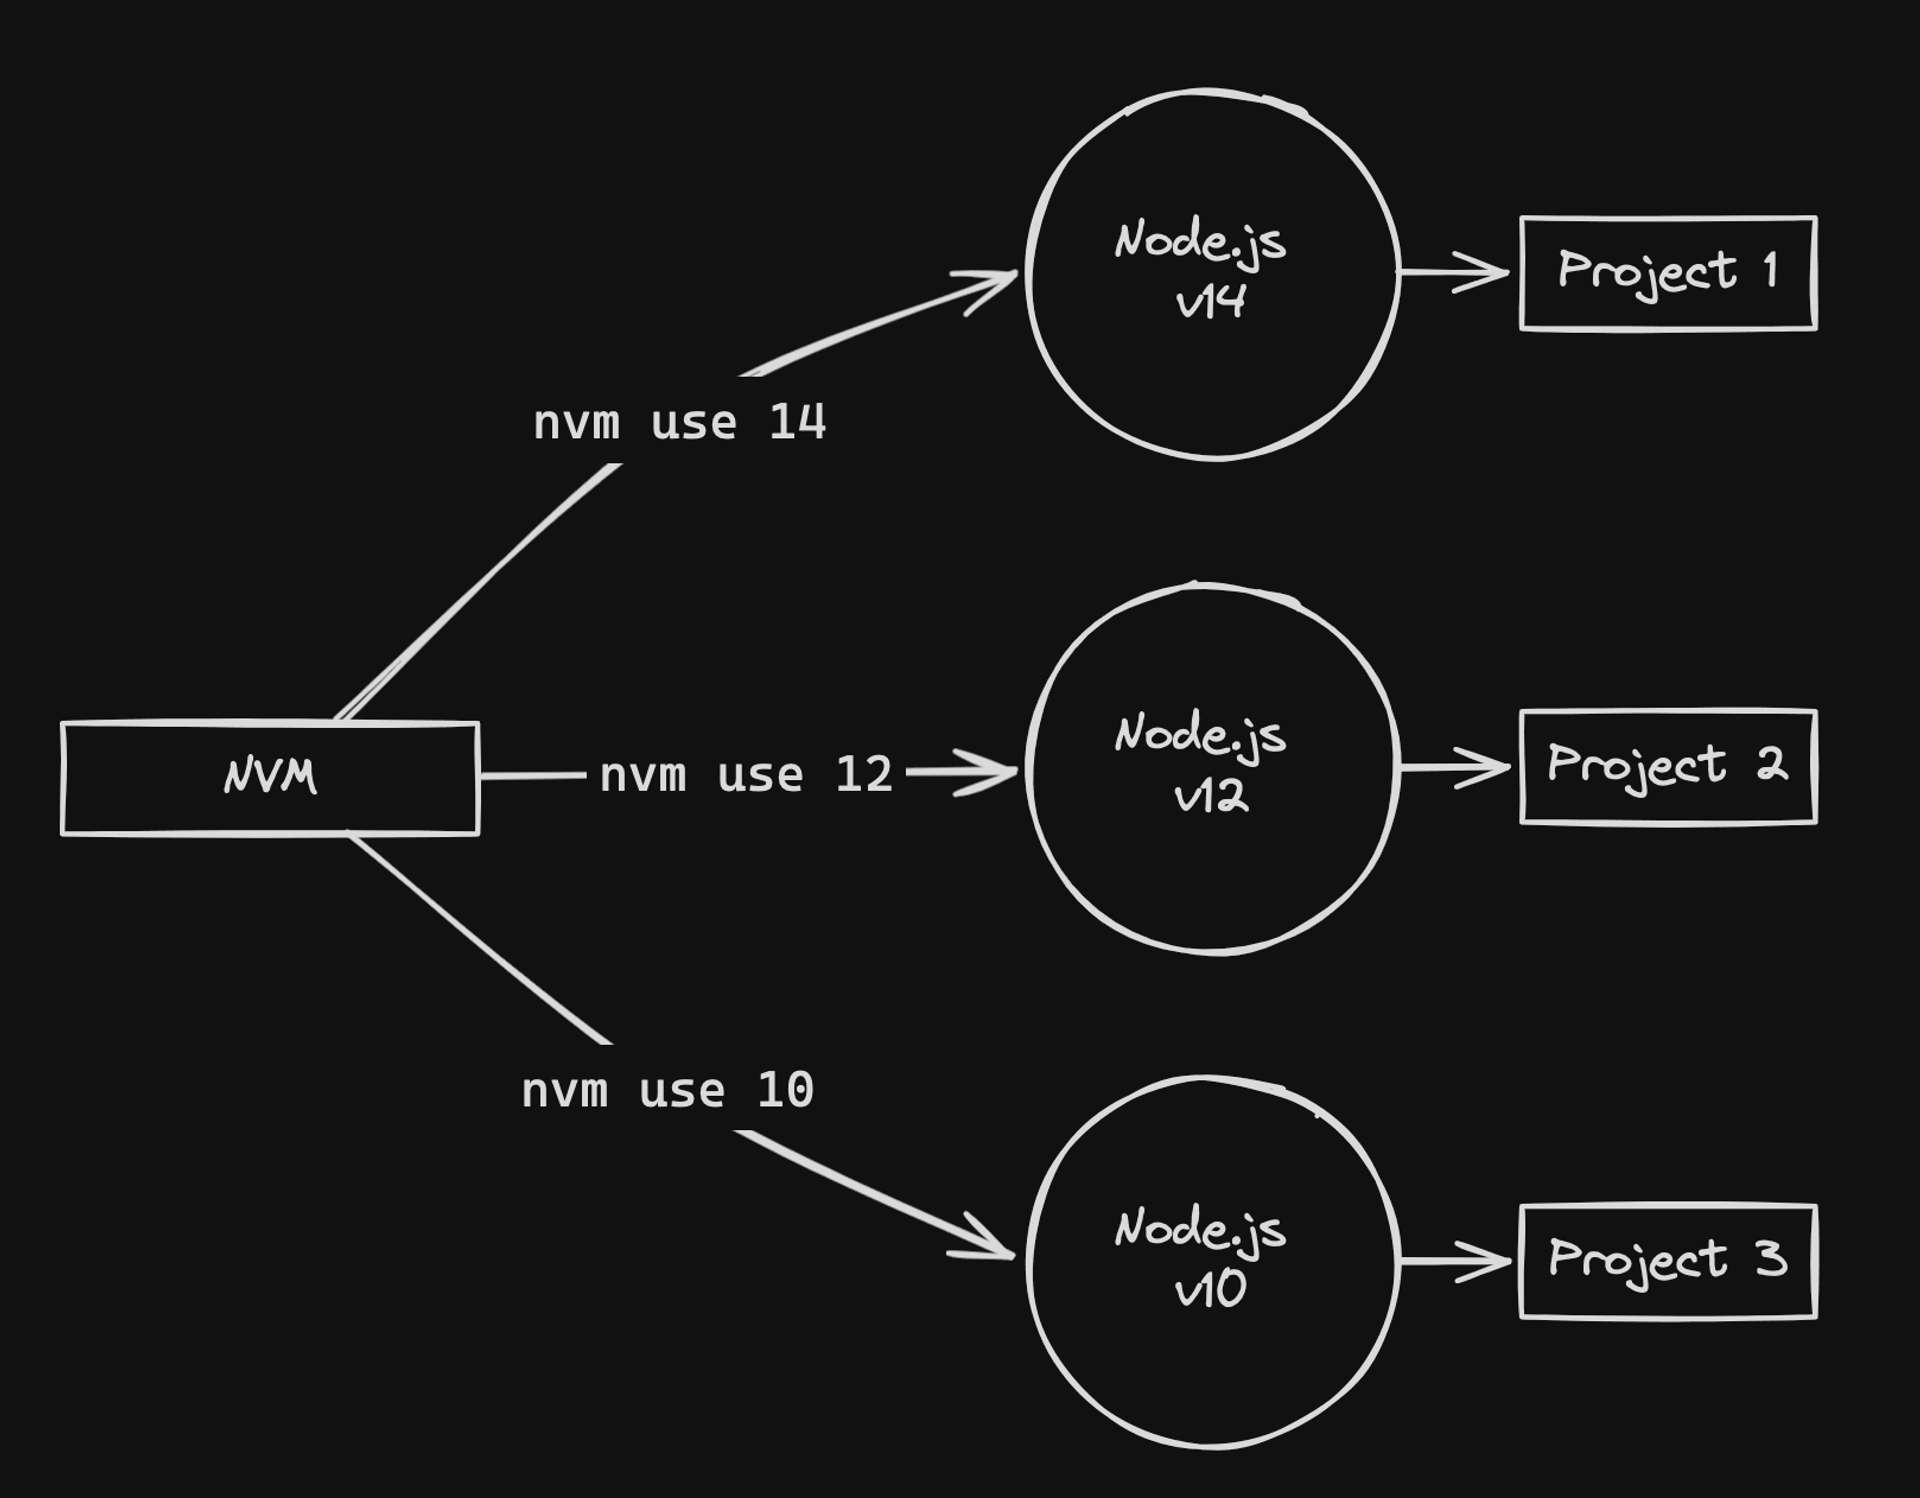
To resolve this, you can use nvm to switch to the required Node.js version for that project. First, check the installed Node.js versions:> nvm ls
v8.0.0
v16.16.0
v16.17.0
-> v20.11.1
system
Then, install the required version if it's not already installed, and switch to it:> nvm install <VERSION>
> nvm use <VERSION>
Now, the node command will use the specified Node.js version for this project. This allows you to work on multiple projects with different Node.js version requirements on the same system, ensuring each project uses the correct Node.js version.
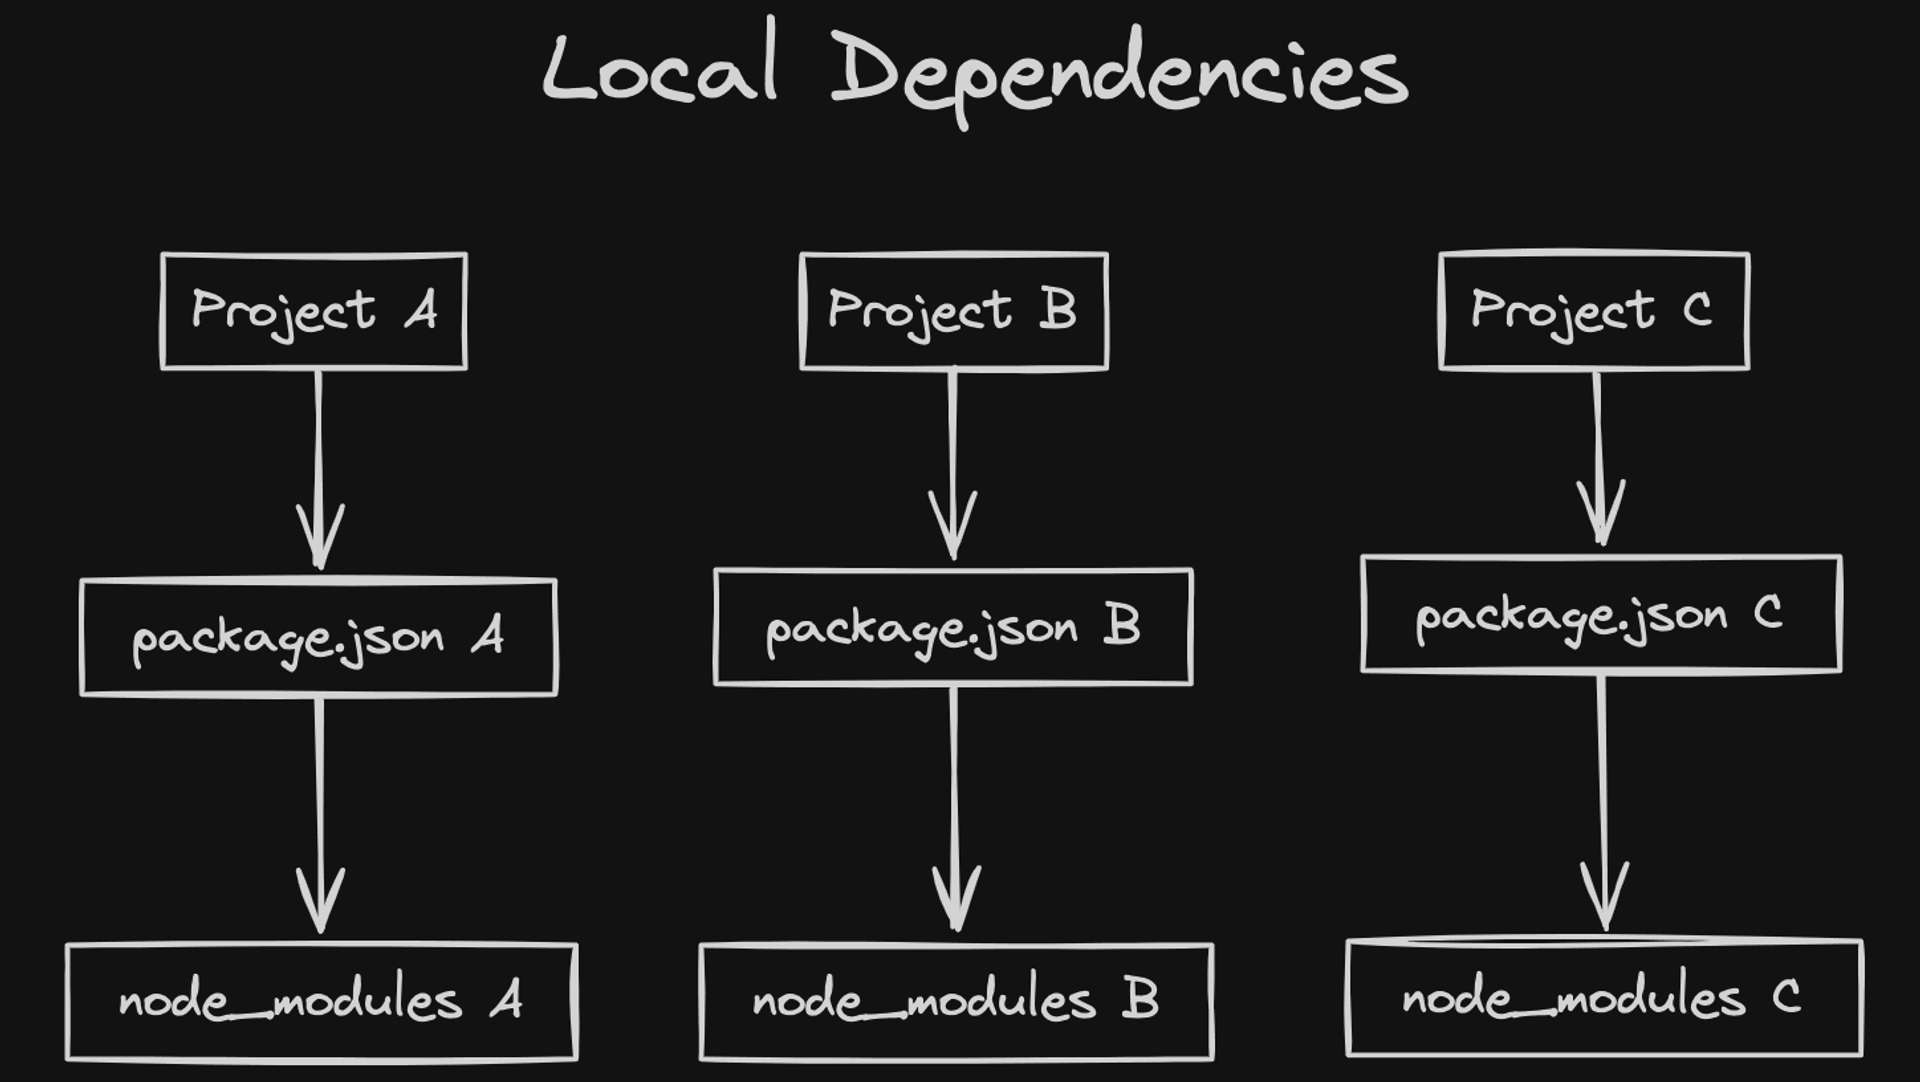
Per-project npm packages are installed in the node_modules directory within the project where you ran the npm install command.
For example, the dependencies used in this blog are listed as follows:package.json
"devDependencies": {
"@11ty/eleventy": "^2.0.1",
"@11ty/eleventy-navigation": "^0.1.3",
"@11ty/eleventy-plugin-rss": "^1.0.7",
"@11ty/eleventy-plugin-syntaxhighlight": "^3.0.1",
"autoprefixer": "^10.4.19",
"eleventy-plugin-local-images": "^0.4.0",
"eleventy-plugin-toc": "^1.1.5",
"file-type": "^16.5.4",
"fs-extra": "^8.1.0",
"jsdom": "^16.5.0",
"luxon": "^2.5.2",
"markdown-it": "^14.1.0",
"markdown-it-anchor": "^8.6.7",
"markdown-it-attrs": "^4.1.6",
"markdown-it-multimd-table": "^4.2.3",
"markdown-it-table-of-contents": "^0.6.0",
"node-fetch": "^2.6.7",
"postcss": "^8.4.38",
"pre-commit": "^1.2.2",
"pre-push": "^0.1.4",
"rollup-plugin-postcss": "^4.0.2",
"rollup-plugin-terser": "^6.1.0",
"shorthash": "0.0.2"
},
"dependencies": {
"@11ty/eleventy-plugin-webc": "^0.11.2",
"@ampproject/toolbox-optimizer": "^2.9.0",
"any-shell-escape": "^0.1.1",
"clean-css": "^4.2.3",
"concurrently": "^7.0.0",
"csp-hash-generator": "0.0.3",
"csso": "^4.0.3",
"datauri": "^3.0.0",
"expect.js": "^0.3.1",
"ffmpeg-static": "^4.4.0",
"hasha": "^5.2.0",
"html-minifier": "^4.0.0",
"image-size": "^0.8.3",
"lru-cache": "^5.1.1",
"markdown-it-footnote": "^4.0.0",
"mocha": "^10.1.0",
"phin": "^3.5.0",
"purge-from-html": "^1.0.3",
"purgecss": "^4.0.3",
"querystring": "^0.2.0",
"rollup": "^2.23.0",
"sharp": "^0.30.5",
"speedlify-score": "^4.0.4",
"touch": "^3.1.0",
"twitter": "^1.7.1"
},
They are not added to the PATH, so you can't run them directly from the terminal (unless you use npx or add a script in your package.json). They are typically libraries or frameworks that your project depends on.
In summary, understanding the different scopes of Node.js installations and npm packages is crucial for managing your Node.js environment effectively. Using a version manager like nvm or n allows you to manage Node.js versions at the per-user and per-project scopes, providing a more flexible and convenient way to work with Node.js.
Multiple Node Installations
From personal experience, having multiple installations of Node is where developers often run into problems with their Node environments.
By multiple Node installations, it means Node was installed using Homebrew, and also using a version manager like nvm or n.
Role of the PATH
The version of Node.js that gets used when you type node in your terminal depends on the order of your system's PATH.
The PATH is a list of directories that your system searches through when looking for executable files in response to commands typed in a terminal. When you type a command like node, your system will search through these directories in order and use the first matching executable it finds.
For example, let's say you have installed Node.js using both Homebrew and NVM.
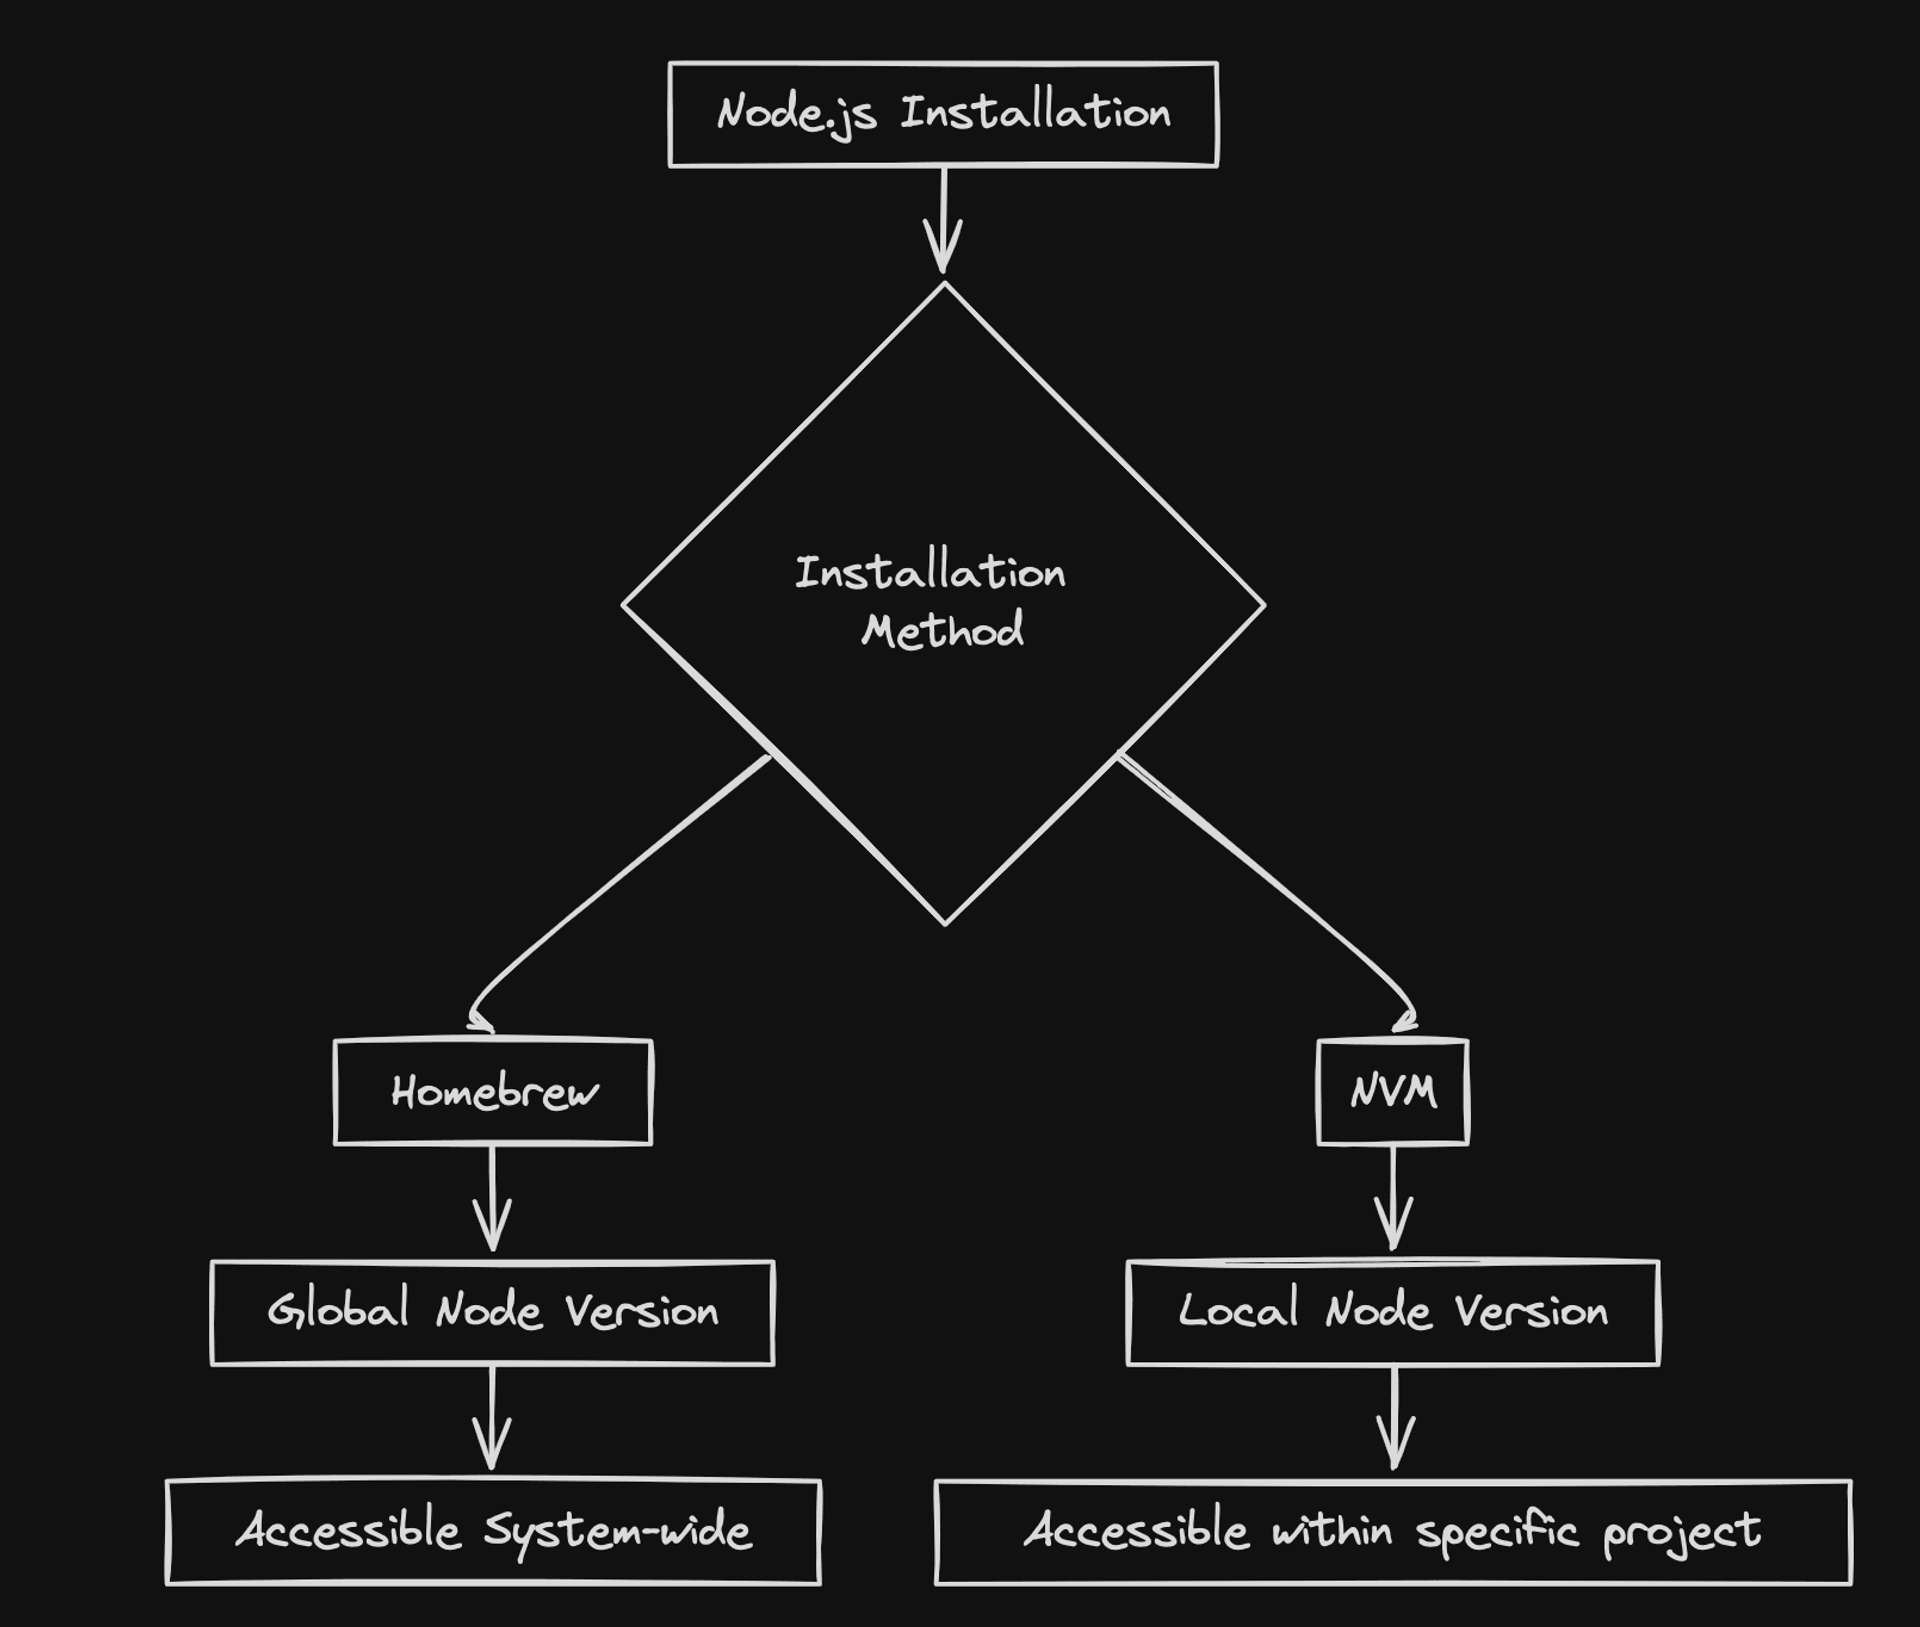
| Installation Method | Typical Binary Location | Scope |
|---|---|---|
| Homebrew | /usr/local/bin/node | System-wide, accessible to all users |
| NVM (Node Version Manager) | /Users/user/.nvm/versions/node/v* | User-specific, allows different Node.js versions per user |
This table shows the typical binary locations for Node.js when installed via Homebrew and NVM, as well as the scope of the installation (system-wide vs. user-specific).
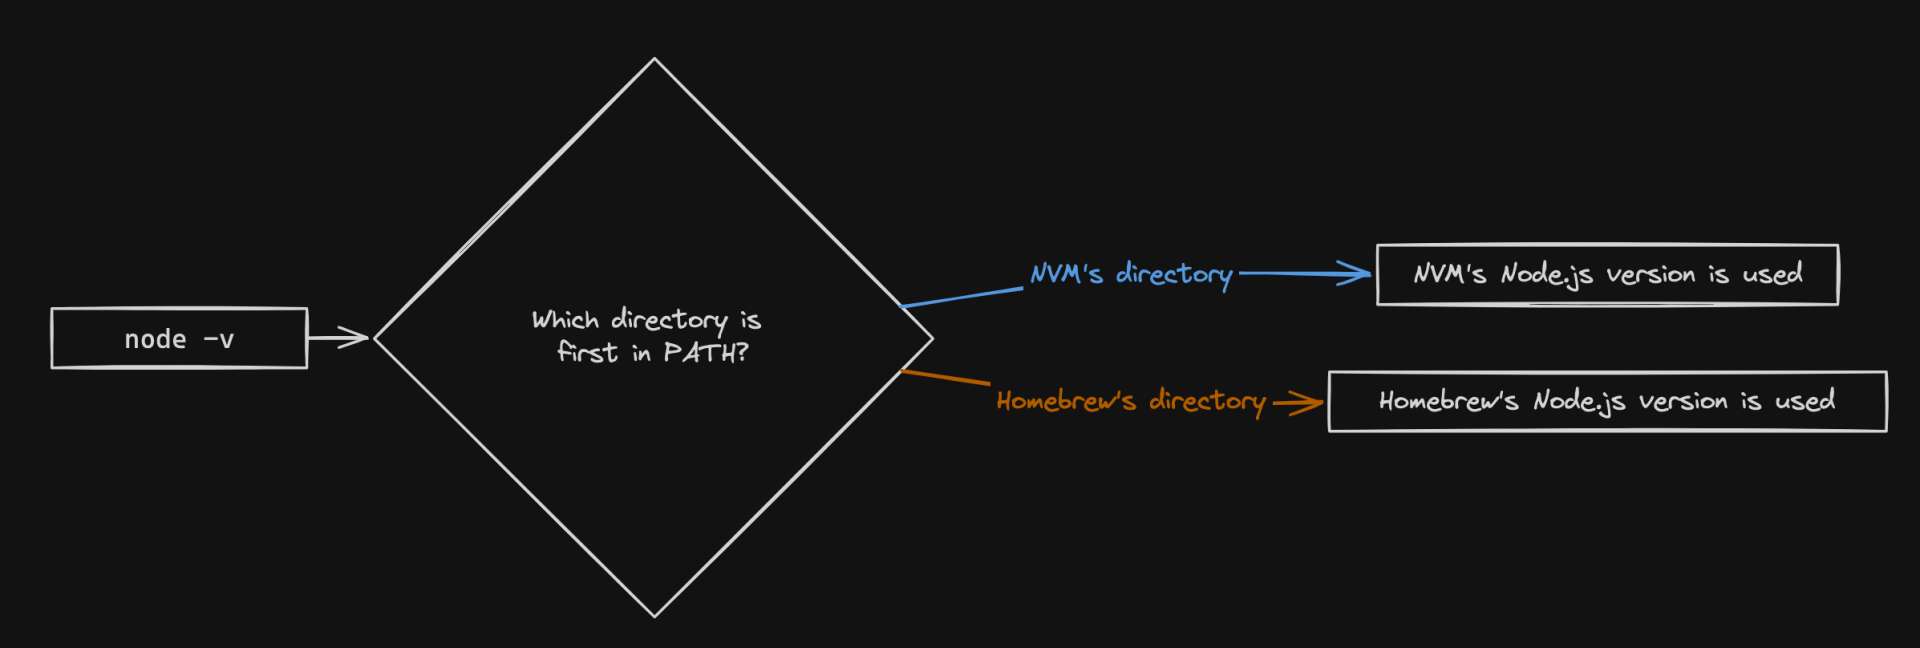
In this diagram, the system first checks the Homebrew directory (/usr/local/bin) for a node executable.
If it doesn't find one, it then checks the NVM directory (/Users/user/.nvm/versions/node/v*).
The version of Node.js that gets used is the one found in the first PATH directory that contains a node executable.
Installation Method Comparison
Let's discuss why NVM is the recommended method of installation from the Node.js Official Documentation.
Let's consider how you'd manage Node versions using Homebrew. If you have two different projects that require two distinct Node.js versions, you'd need to unlink the current version:> brew unlink node
And then you can link a different version:> brew link node@VERSION
# Sometimes it might be required to link them with the --force and --overwrite options:
> brew link --force --overwrite node@14
However, when a new Node.js version is released and you update to it by running brew upgrade, the link to the previous version will be removed and the most recent Node.js version will be linked instead.
To maintain a specific Node.js version, you might consider adding your desired Node.js version to the PATH (and restart the shell):> echo 'export PATH="/usr/local/opt/node@14/bin:$PATH"' >> ~/.zshrc
This approach configures Node.js at the system level, which can be inconvenient and inflexible.
By doing this, you would need to configure Node at the system level which can be error-prone and inconvenient.
In contrast, a version manager like nvm or n allows you to configure Node.js locally for each project. This provides greater flexibility, as you can easily switch between different Node.js versions depending on the requirements of each project.
To summarize, the reason why you'd want to use a version manager like NVM or n to manage node versions is that you can confgure node locally.
Package Managers
Lastly, this last section explores several other package managers available, each with its unique features and benefits.
Modern web applications rely heavily on external libraries and tools (dependencies). Keeping these dependencies consistent across different environments can be a major headache. Package managers like npm, pnpm, and yarn exist to streamline this process.
Here are some of the most commonly used package managers in the industry today:
| Package Manager | Description | Key Features |
|---|---|---|
| npm | The default package manager for Node.js, bundled with Node.js installation. | Supports a vast registry of packages, uses a nested dependency model, and offers semantic versioning and package-lock.json for deterministic installs. |
| Yarn | Developed by Facebook as an alternative to npm. It introduced some features that were not available in npm at the time of its release. | Offers workspaces for managing multiple packages within a single codebase, deterministic installs with yarn.lock, and improved performance via offline cache and parallel downloads. |
| pnpm | A fast, disk-efficient package manager for Node.js. | Uses a non-flat node_modules (symlinked) to solve the issue of duplicate dependencies, resulting in less disk space usage. It also offers a strict mode that avoids creating implicit dependencies. |
| Bower | A package manager primarily used for front-end web development. | Optimized for the front-end, Bower uses a flat dependency tree, reducing page load to a minimum. However, it's largely deprecated and not recommended for new projects. |
| Bun | A fast and simple package manager for Node.js. | Focuses on speed and simplicity, with features like zero-config monorepo support, automatic retries for network requests, and a streamlined command-line interface. |
Tooling
Version Management Layers
We previously discussed Homebrew and Node version management for Unix environments. Let's introduce tools like asdf and Corepack that act as additional layers on top of your Node environment, specifically for version control.
However, the aim of this post is not to dive deep into these version management layers, but to clarify that asdf and Node version management are two distinct entities, each with their own unique roles:
Differentiating "Version Managers"
While both asdf and Corepack manage versions, they have distinct purposes:
asdf - The Multi-Lingual Swiss Army Knife: This versatile version manager tackles multiple languages, including Node.js. It enables you to switch between different versions of Node.js (and other languages) for each project, providing broader control.
Corepack - The Node.js Package Manager Bridge: This specialized tool focuses on Node.js projects. It acts as a bridge, ensuring the project uses the correct package manager version (like yarn, pnpm, or npm) during development, regardless of your system's global installation.
Key Takeaway: Both asdf and Corepack excel at version management, but with different focuses. asdf empowers you across languages, while Corepack keeps your Node.js projects and package managers in sync.
Corepack
Now that we've discussed methods of Node installation, managing Node versions, we can use this infomration to discuss Corepack and pnpm.
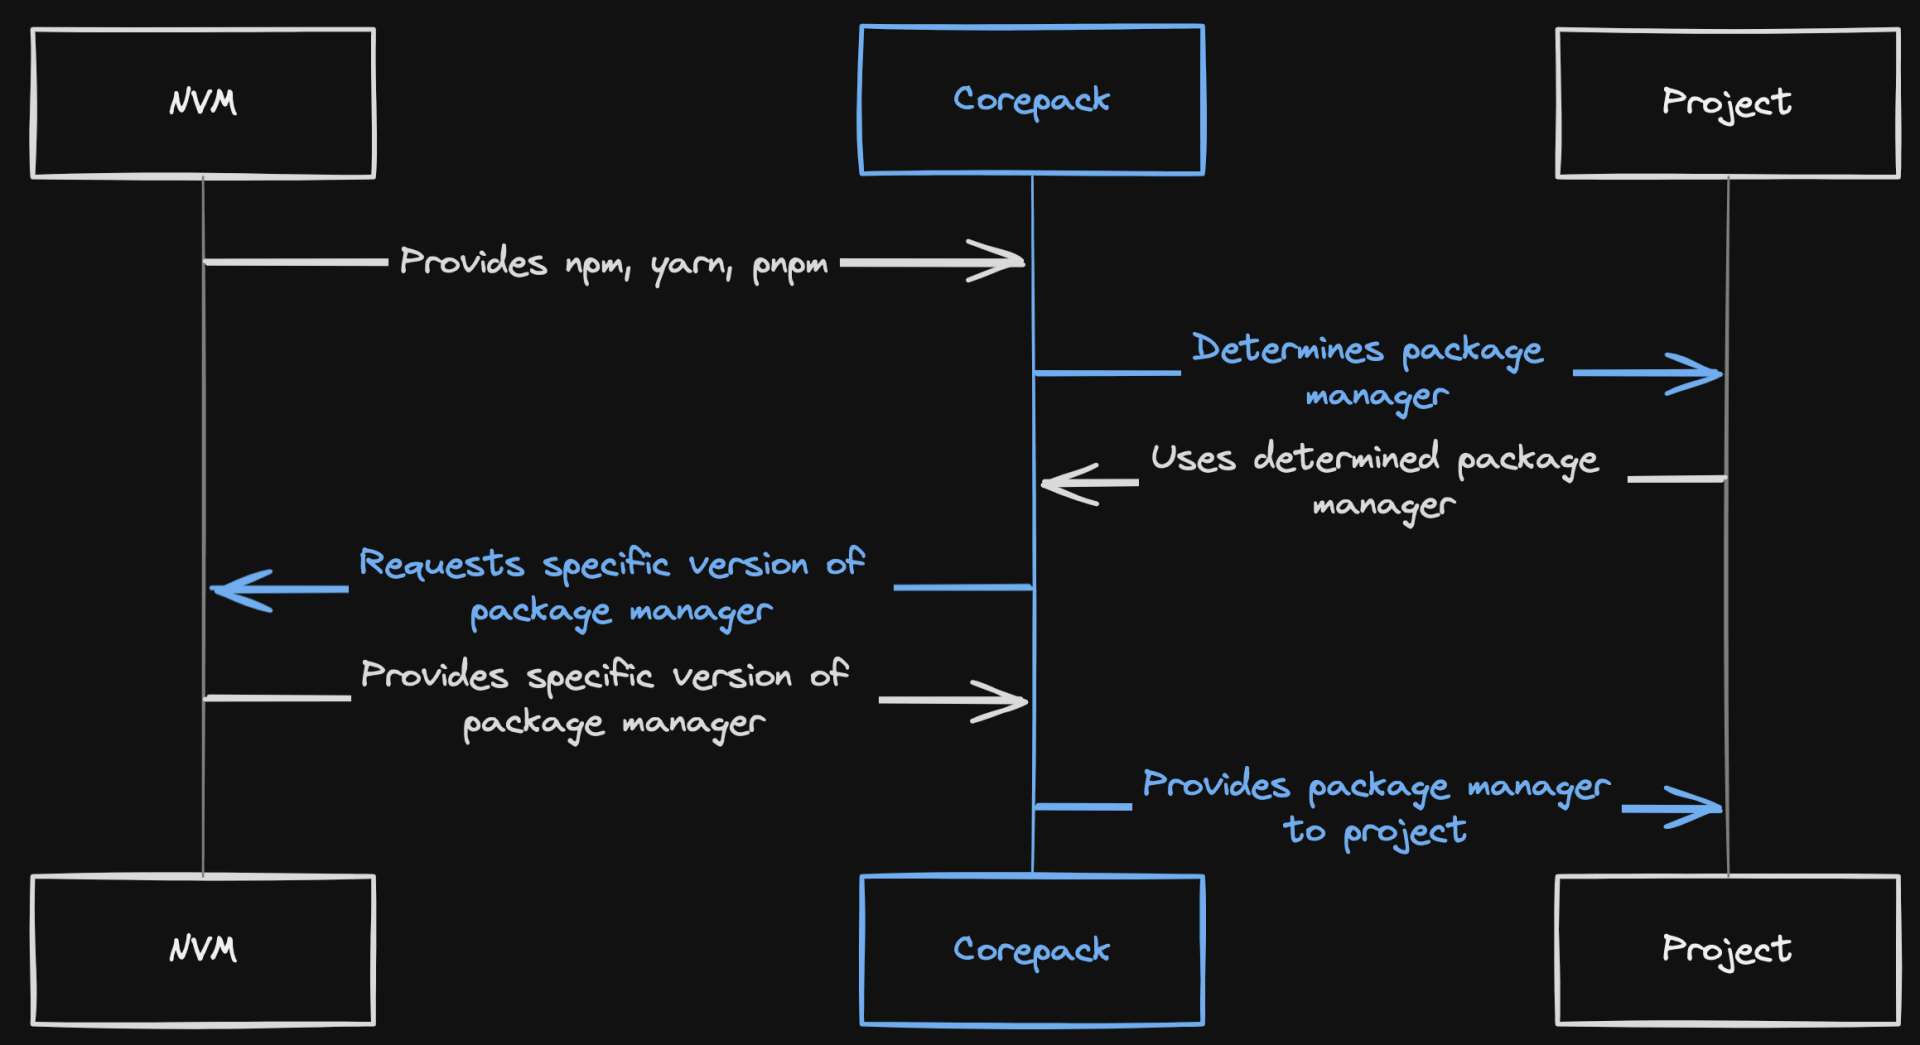
Corepack is a tool that's quickly gaining popularity in the Node.js ecosystem. It serves as a liaison between Node.js projects and their intended package managers during the development process.
While Corepack is not a version manager itself, it ensures that the specified version of the package manager is used within the project. This eliminates the need for global installations of these package managers, providing a more isolated and controlled environment for each project.
To enable Corepack to manage packages in a project, you need to set the packageManager field in the project's package.json file. This field should be set to the exact version of the package manager (pnpm or yarn) that the project is intended to use:{
"name": "Example",
"version": "1.1.1",
"packageManager": "pnpm@8.10.0"
}
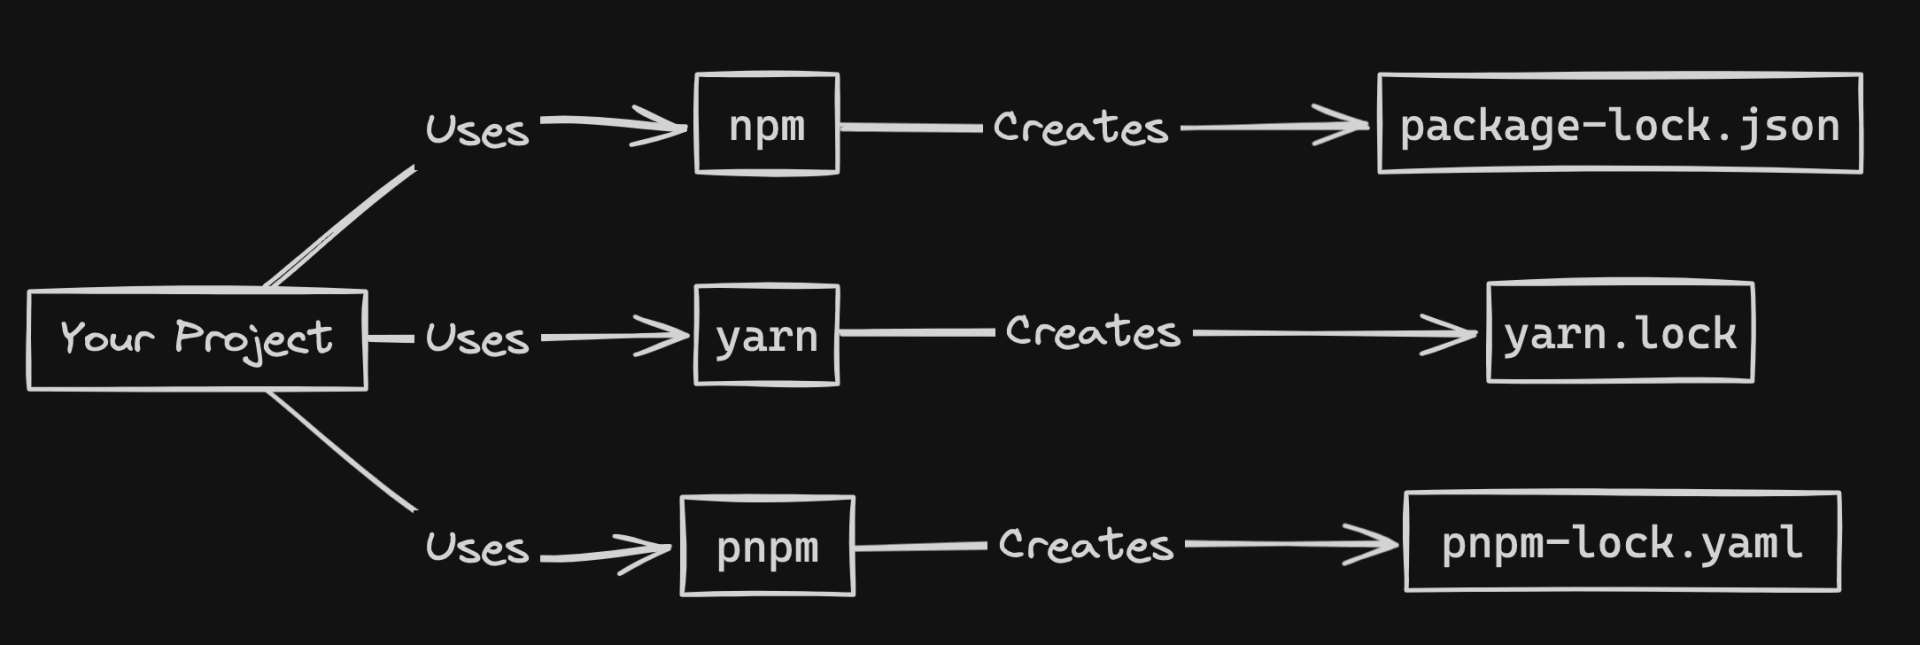
For instance, if you have three separate Node.js projects, each could use a different package manager: npm, yarn, or pnpm. Each of these package managers would create their own environment-specific lock files.
Corepack provides binary proxies for each supported package manager. When invoked, these proxies identify the package manager configured for the current project, download it if necessary, and then run it.
This ensures that the correct version of the package manager is always used for each project, regardless of what's installed globally on the system.
PNPM Globally
Corepack is primarily designed to work with project-level dependencies, so it doesn't directly support the installation of global packages by default.
However, if you want to use a package manager like pnpm globally, you can manually enable Corepack:> corepack enable
This command will install pnpm in the first node directory, such as /Users/user/.nvm/versions/node/v20.11.1/ for nvm. After this, you can use pnpm to install global packages:> pnpm add -g aicommits
# aicommits should now be symlinked to PATH binaries
> aicommits
If you installed pnpm via Corepack, you can change your global pnpm version with:# Node 18
> corepack prepare pnpm@latest-6 --activate
# Node 20
> corepack install --global pnpm@6
This command tells Corepack to prepare the latest 6.x version of pnpm and activate it for use in your current shell session.
PNPM Versions & NPM Install
Installing pnpm via npm is one of the options listed in the official guide. This requires Node v18+. However, if you choose this method and have installed pnpm globally, switching between pnpm versions will require a manual uninstallation and reinstallation:# Optional: Uninstall current pnpm
> npm uninstall -g pnpm
# Install specific pnpm version
> npm install -g pnpm@VERSION
To illustrate, let's say you're using a specific Node.js version and you want to install pnpm in that environment:# Check the current Node.js version
> which node
/Users/user/.nvm/versions/node/v20.11.1/bin/node
# Install pnpm
> npm i -g pnpm
# Verify pnpm installation
/Users/jon/.nvm/versions/node/v20.11.1/bin/pnpm
Note: When you switch Node.js versions with nvm, the npm global packages associated with that version also switch. This is because nvm isolates each Node.js version and its npm global packages to avoid conflicts. So, if you installed pnpm globally under Node.js version
18.20.1and switch to18.7.0usingnvm, pnpm might not be available as it wasn't installed for18.7.0.