Introduction
Prism is a lightweight, extensible syntax highlighter that supports a broad spectrum of languages and is conveniently pre-packaged with 11ty.
The eleventy-plugin-syntaxhighlight plugin enables syntax highlighting in 11ty, allowing for the display of code blocks on a page. This is useful for showcasing sample code, configurations, code snippets, and more.
However, displaying line numbers is not a feature supported by the syntax highlighter. Some workarounds have been attempted using CSS counters, as shown below from Github issues #10.
To keep my existing code intact, including 11ty's diff-* syntax and line highlights js/4-5/6,7, I wanted to add line numbers to code blocks during the build process. This way, I didn't need to bring in more libraries. Fortunately, Markdown-it makes it possible to modify renderer rules for code blocks to achieve this.
Requirements
In my syntax code blocks, I primarily highlight code from JavaScript and other web-based languages, along with bash scripts, and configuration files in formats such as TOML and YAML. I may also include Git syntax occasionally.
To support this, I'll need to customize the renderer to support the following:
- Highlighting Specific Lines
- Utilize 11ty's markdown highlighter to emphasize certain lines of code.
- Code Diffs
- Support for 11ty's
diff-*syntax to display differences between code versions.
- Support for 11ty's
- Accurate Line Counting
- Code blocks should account for white spaces and new lines as individual lines, ensuring an accurate line count.
- No Additional Plugins
- The implementation should work independently, without the need for extra plugins.
Potential Upgrades
Looking ahead, it would be beneficial to package this functionality into a plugin for easier integration. Additionally, we could enhance the feature set by providing an option to toggle line numbers on or off. We could also introduce a shortcode to specify the starting line number, offering even more flexibility in how code blocks are displayed.
Markdown to HTML
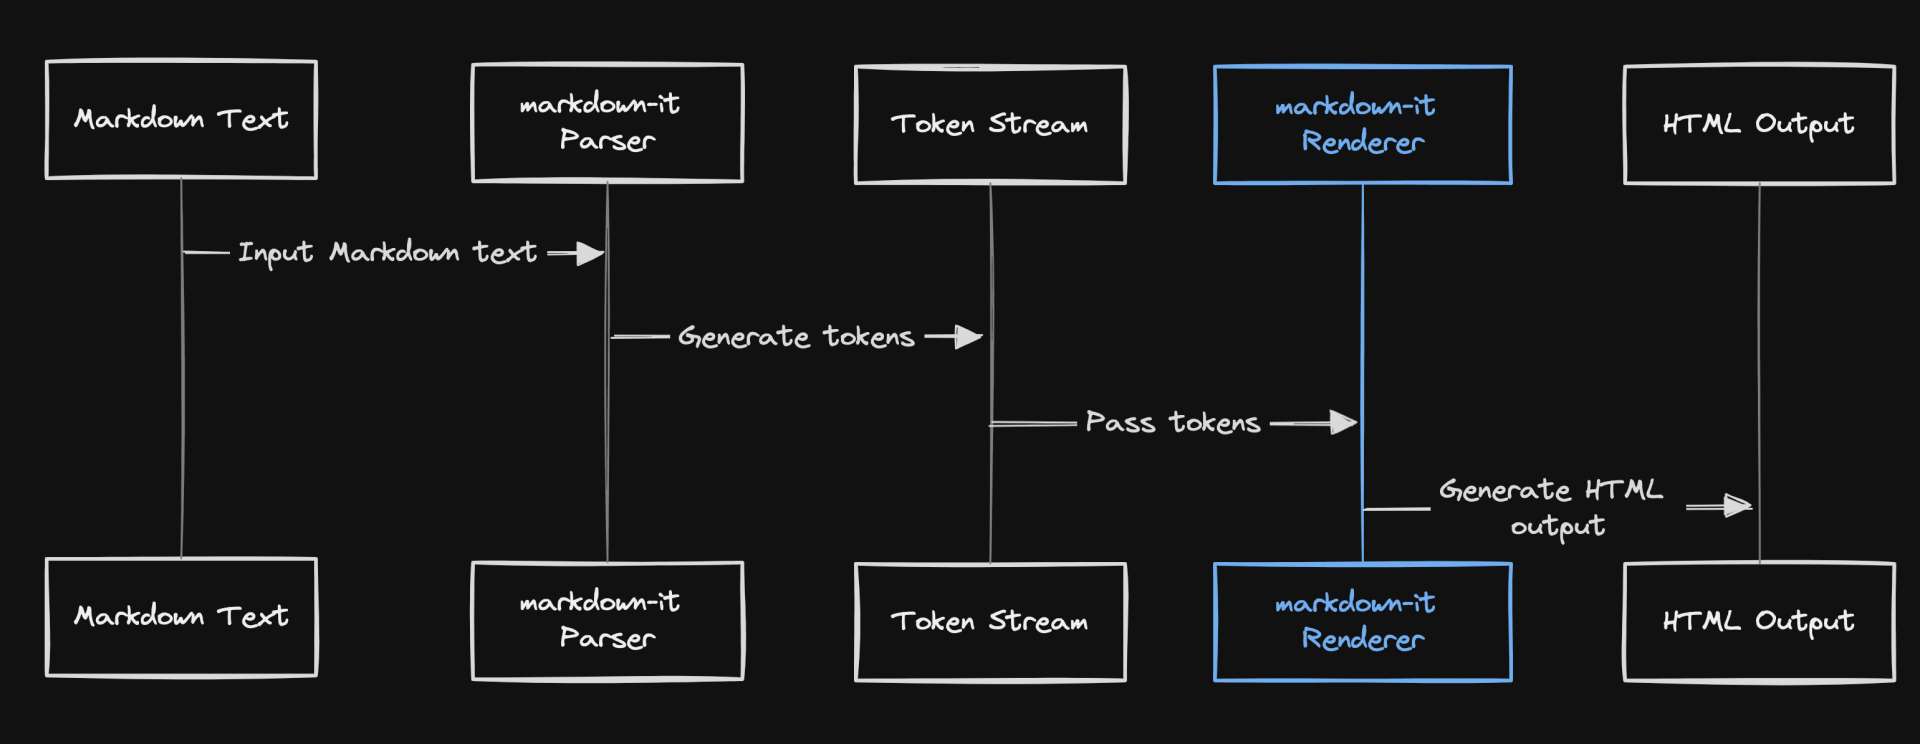
The markdown-it library uses a two-step process to convert Markdown into HTML: parsing and rendering.
Suggested Reading
Parsing
During the parsing step, markdown-it converts the Markdown text into a stream of tokens. Each token represents a piece of Markdown syntax, recognized by a set of parsing rules that identify specific syntax patterns in the text.
Rendering
In the rendering step, markdown-it converts the token stream into HTML. This is accomplished by a set of rendering rules, where each rule is associated with a specific type of token and generates the corresponding HTML.
Each rendering rule is associated with a specific type of Token and is responsible for generating the HTML that represents that token.
Renderer Rules
You can customize the rendering process by modifying the renderer rules.
For instance, the rules.fence function is a rendering rule for fenced code block tokens. By replacing this function, you can control how fenced code blocks are rendered, adding features like line numbers or syntax highlighting.// .eleventy.js
markdownLibrary.renderer.rules.fence = function (
tokens,
idx,
options,
env,
slf
) {
const token = tokens[idx];
// Add your custom rendering logic here
};
In addition to parsing and rendering, markdown-it allows for additional transformations to be applied in between these steps. You can also directly change the output in a Renderer for many simple cases.
11ty
Template Engines
In 11ty, the markdownTemplateEngine and htmlTemplateEngine settings determine the processing of templates before they're passed to the renderer.return {
templateFormats: ["md", "njk", "html", "liquid"],
// Pre-process *.md files with: (default: `liquid`)
markdownTemplateEngine: "liquid",
// Pre-process *.html files with: (default: `liquid`)
htmlTemplateEngine: "njk",
These engines handle the processing of template syntax within your files, such as loops, conditionals, and variable interpolations.
Compatibility Considerations
Please note that for versions of @11ty/eleventy-plugin-syntaxhighlight prior to v3.2, the rendering behavior differs slightly. The dependency versions used in this guide are as follows:{
"@11ty/eleventy": "^2.0.1",
"markdown-it": "^12.0.4",
"@11ty/eleventy-plugin-syntaxhighlight": "^5.0.0",
}
If your custom renderer needs to work with raw, unprocessed Markdown (including template syntax), this tutorial's implementation won't work with Nunjucks or any other template engine because these engines process the template syntax before the renderer gets the content.
However, if your renderer works with the tokenized representation of the Markdown content (which is the usual case), it should work fine regardless of the template engine used.
Enable Syntax Highlighting
To activate syntax highlighting, we'll leverage 11ty's syntax highlighting features for diffs and highlighting.const pluginSyntaxHighlight = require('@11ty/eleventy-plugin-syntaxhighlight');
eleventyConfig.addPlugin(pluginSyntaxHighlight, {
// The 'wrapAllHighlightLines' option is optional
// for this tutorial's implementation
preAttributes: {
tabindex: 0,
"data-render-src": "11ty",
},
// The 'errorOnInvalidLanguage' option is optional
errorOnInvalidLanguage: true,
});
let markdownLibrary = MarkdownIt({
html: true,
breaks: true,
linkify: true,
}).use(...otherPlugins)
eleventyConfig.setLibrary("md", markdownIt(options));
You may find the plugin option wrapAllHighlightLines useful, so it's worth experimenting with it.
With this configuration, code blocks processed using the plugin's renderer will include the <pre data-render-src="11ty" ...> attribute.
This configuration will apply to code blocks with language types such as js/4-5, js/4,5/7-8, diff-, and diff-*, which are processed through the plugin.
Custom Renderer
Outlining Class Methods
With 11ty setup, we can begin outlining methods we will use to override the renderer rules from markdown-it.
The markdown-it Renderer Interface Generates HTML from a parsed token stream.
As a reference, we can look to the default implementation to understand what we should generate in the resulting HTML.class RendererConfig {...}/* renderer-config.js */
const markdownIt = require("markdown-it");
// This is optional if you want to use markdown-it utils
const md = markdownIt();
class RendererConfig {
constructor(renderer) {
this.defaultRender = renderer.rules.fence;
}
/**
* Extracts the language of the code block from the Markdown fence token.
*
* @param {Object} token - The Markdown fence token containing the code content.
* @returns {string} - The language of the code block.
*/
getLanguage(token) {
// Implementation...
}
/**
* Returns the lines of code from the Markdown fence token without any syntax highlighting.
*
* @param {Object} token - The Markdown fence token containing the code content.
* @returns {string[]} - An array of code lines.
*/
getLinesWithoutHighlighting(token) {
return token.content.split("\n");
}
/**
* Formats the lines of code in a Markdown fence block, adding line numbers and handling empty lines.
*
* @param {string[]} lines - An array of code lines.
* @returns {object} - An object containing the formatted HTML lines and the corresponding line numbers.
*/
formatLines(lines) {
// Implementation...
}
/**
* Renders the HTML for a Markdown fence block, including line numbers and syntax highlighting.
*
* @param {Object[]} tokens - The Markdown tokens.
* @param {number} idx - The index of the current Markdown fence token.
* @param {Object} options - The Markdown rendering options.
* @param {Object} env - The Markdown rendering environment.
* @param {Object} slf - The Markdown renderer instance.
* @param {string} lineNumbers - The HTML for the line numbers.
* @returns {string} - The rendered HTML for the Markdown fence block.
*/
getHtmlWithLineNumbers(tokens, idx, options, env, slf, lineNumbers) {
// Implementation...
}
/**
* Wraps the provided HTML code block in a figure element with a data-code-language attribute.
*
* @param {string} html - The HTML code block to be wrapped.
* @param {string} lang - The programming language of the code block.
* @returns {string} - The HTML code block wrapped in a figure element.
*/
wrapHtmlInFigure(html, lang) {
// Implementation...
}
}
module.exports = RendererConfig;
As a future enhancement, you could refactor this as a separate eleventy or markdown-it plugin, support features like starting like numbers using paired shortcodes in 11ty, and add better support for diffs with line numbers but that is beyond the scope of this tutorial.
Integrating Renderer
Note: This tutorial assumes you aren't already overriding the renderer for code blocks. If you are, you'll need to adjust this approach to work alongside your existing code.
To begin, import the RendererConfig class from the renderer-config.js file (or whatever you've chosen to name it). Next, create a new instance of the RendererConfig class, passing in the renderer from the markdown library.const RendererConfig = require("./_11ty/renderer-config.js");
const renderer = new RendererConfig(markdownLibrary.renderer);
markdownLibrary.renderer.rules.fence = function (
tokens,
idx,
options,
env,
slf
) {
// Implementation goes here
};
This sets up a new rendering rule for fenced code blocks in your markdown content. The actual implementation of this rule will be added in the next steps, where we'll leverage the methods provided by our RendererConfig class to generate line numbers and format the code block content.
Generating Line Numbers
At this point in the rendering process, the Eleventy plugin has already applied syntax highlighting to the content of the code block. We can utilize this pre-existing functionality in our custom renderer rule.
The syntax-highlighted content can be retrieved from the token content and used as follows:const RendererConfig = require("./_11ty/renderer-config.js");
const renderer = new RendererConfig(markdownLibrary.renderer);
markdownLibrary.renderer.rules.fence = function (
tokens,
idx,
options,
env,
slf
) {
const token = tokens[idx];
const lang = renderer.getLanguage(token);
let lines;
let html;
lines = rendererConfig.getLinesWithoutHighlighting(token);
const { htmlLines, lineNumbers } = rendererConfig.formatLines(lines);
};
First, we implement a method to extract the language from the Markdown fence token ```. We also split the token content into an array of lines, which will be used to generate line numbers.
Our goal is to match the HTML structure generated by the Prism line-numbers plugin, which uses a NodeList of elements to represent each line number.class RendererConfig {...} - Generate line number elementsclass RendererConfig {
// ....
/**
* Extracts the language and optional title from the info string of a Markdown fence token.
*/
getLanguage(token) {
return token.info ? unescapeAll(token.info).trim() : ''
}
/**
* Returns the lines of code from the Markdown fence token without any syntax highlighting.
*/
getLinesWithoutHighlighting(token) {
return token.content.split("\n");
}
/**
* Formats the lines of code in a Markdown fence block, adding line numbers and handling empty lines.
*/
formatLines(lines) {
let htmlLines = [];
let lineNumbers = "";
// Remove trailing empty strings
while (lines.length > 0 && lines[lines.length - 1].trim() === "") {
lines.pop();
}
lines.forEach((line, i) => {
// Always increment lineNumbers, regardless of whether the line is empty
lineNumbers += `<span>${i + 1}</span>`;
// This wrapper can be customized as needed. It encapsulates a line of code where syntax highlighting is applied.
htmlLines.push(
`<div class="line" data-line-number="${i + 1}">${
line.trim() !== "" ? line : ""
}</div>`
);
});
return { htmlLines, lineNumbers };
}
// ....
The formatLines method accomplishes two things:
- It generates line numbers for each line of code, regardless of whether the line is empty or not.
- It wraps each line of code in a
<div>tag, which can be customized as needed. This encapsulates the syntax-highlighted code.
Later, when we inject our line numbers into the code block HTML using lineNumbers, we can also use htmlLines if we want each highlighted line to be wrapped in a line.
For example, the output could look like this:<div class="line" data-line-number="12">
<span class="token comment">// Implement me</span>
</div>
This is similar to the default output generated by Prism:<span class="token comment">// Implement me</span>
This is optional. I added this for flexibility in how the highlighted lines are displayed, while also ensuring that line numbers are correctly generated and displayed.
Injecting Line Numbers
Next, we integrate the list of line number elements we've generated into our token content.markdownLibrary.renderer.rules.fence = function (
tokens,
idx,
options,
env,
slf
) {
const token = tokens[idx];
const lang = renderer.getLanguage(token);
let lines;
let html;
lines = rendererConfig.getLinesWithoutHighlighting(token);
const { htmlLines, lineNumbers } = rendererConfig.formatLines(lines);
html = rendererConfig.getHtmlWithLineNumbers(
tokens,
idx,
options,
env,
slf,
lineNumbers
);
};
In this step, we're inserting our line numbers right before the closing </code> tag, mirroring the approach used by Prism. This placement can be adjusted to suit your specific needs.class RendererConfig {...} - Inject line numbersclass RendererConfig {
// ....
/**
* Renders the HTML for a Markdown fence block, including line numbers and syntax highlighting.
*/
getHtmlWithLineNumbers(tokens, idx, options, env, slf, lineNumbers) {
let html = this.defaultRender(tokens, idx, options, env, slf);
html = html.replace(
/<pre class="([^"]*)"/g,
'<pre class="$1 line-numbers mdit-render"'
);
// Put the line numbers before the </code> tag
html = html.replace(
/<\/code>/g,
`<span aria-hidden="true" class="line-numbers-rows">${lineNumbers}</span></code>`
);
return html;
}
// ....
Lastly, remember to return the updated HTML in your renderer rule.markdownLibrary.renderer.rules.fence = function (
tokens,
idx,
options,
env,
slf
) {
const token = tokens[idx];
const lang = renderer.getLanguage(token);
let lines;
let html;
lines = rendererConfig.getLinesWithoutHighlighting(token);
const { htmlLines, lineNumbers } = rendererConfig.formatLines(lines);
html = rendererConfig.getHtmlWithLineNumbers(
tokens,
idx,
options,
env,
slf,
lineNumbers
);
return html
};
With the modifications we've made, a markdown code block like this:console.log('hello world');
Should now be rendered by the parser into the following HTML:<pre class="language-js line-numbers mdit-render" tabindex="0" data-render-src="11ty">
<code class="language-js">console<span class="token punctuation">.</span><span class="token function">log</span><span class="token punctuation">(</span><span class="token string">'hello world'</span><span class="token punctuation">)</span><span class="token punctuation">;</span><span aria-hidden="true" class="line-numbers-rows"><span>1</span></span>
</code>
</pre>
Line Numbers for Each Wrapped Line
As mentioned in the Generating Line Numbers section, if you prefer a structure where each line is individually wrapped, you can do this:class RendererConfig {
_getWrappedLineCodeHtml(lang, htmlLines, lineNumbers) {
return `<pre class="line-numbers language-${lang}" data-render-src="custom"><code>${htmlLines.join(
""
)}<span class="line-numbers-rows">${lineNumbers}</span></code></pre>`;
}
}markdownLibrary.renderer.rules.fence = function (
tokens,
idx,
options,
env,
slf
) {
const token = tokens[idx];
const lang = renderer.getLanguage(token);
let lines;
let html;
lines = rendererConfig.getLinesWithoutHighlighting(token);
const { htmlLines, lineNumbers } = rendererConfig.formatLines(lines);
- html = rendererConfig.getHtmlWithLineNumbers(
- tokens,
- idx,
- options,
- env,
- slf,
- lineNumbers
- );
+ html = rendererConfig._getWrappedLineCodeHtml(lang, htmlLines, lineNumbers);
return html
};
If you go this route, you'll have to do the syntax highlighting yourself. This means you'll need to override the default syntax highlighting that comes with the Eleventy plugin. Here's an example of how you can swap out the content in the code blocks.markdownLibrary.renderer.rules.fence = function (
tokens,
idx,
options,
env,
slf
) {
const token = tokens[idx];
const lang = token.info ? String(token.info).trim() : '';
let lines = token.content.split('\n').filter((line) => line.trim() !== '');
let htmlLines = [];
lines.forEach((line, i) => {
if (line.trim() !== '') {
let highlighted = Prism.highlight(
line,
Prism.languages[lang] || Prism.languages.markup,
lang
);
htmlLines.push(
`<div class="line" data-line-number="${i + 1}">${highlighted}</div>`
);
}
});
let html = `<pre class="line-numbers language-${lang}"><code>${htmlLines.join(
''
)}<span class="line-numbers-rows">${lineNumbers}</span></code></pre>`;
html = html.replace(
/<pre class="([^"]*)"/g,
'<pre class="$1 line-numbers mdit-render"'
);
return html;
};
Adding Styles
Please be aware that there are currently some peculiarities when using the diff-* or highlight syntax. While it's not perfect, it accomplishes what I needed for now.
For completeness, I'm also sharing my styles.
Please note that they are still a work in progress, and it's a bit all over the place. Feel free to adapt them to your needs or use them as a starting point.CSS for Line Numbers, Diffs, and Line Highlights
code[class*="language-"],
pre[class*="language-"] {
-moz-hyphens: none;
-moz-tab-size: 4;
-ms-hyphens: none;
-o-tab-size: 4;
-webkit-hyphens: none;
font-family: var(--ff-mono);
font-size: var(--fs-code);
hyphens: none;
tab-size: 4;
text-align: left;
white-space: break-spaces;
word-break: normal;
word-spacing: normal;
word-wrap: normal;
}
details .codeblock {
margin: auto 0;
width: 100%;
max-width: unset;
}
details pre[class*="language-"].line-numbers {
background-color: rgb(20, 20, 20);
}
details pre[class*="language-"].line-numbers > code {
background: rgb(22 22 22);
}
code[class*="language-"] {
padding: 0;
word-wrap: break-word;
}
pre[class*="language-"] {
overflow: auto;
}
:not(pre) > code[class*="language-"],
pre[class*="language-"] {
color: var(--text-color);
margin: 0;
/* box-shadow: var(--shadow-elevation-low); */
}
:not(pre) > code[class*="language-"] {
padding: 0.1em;
white-space: normal;
}
pre[class*="language-"].line-numbers {
counter-reset: linenumber;
display: flex;
justify-content: center;
height: 100%;
margin: 0;
position: relative;
padding-top: 1.5rem;
/* overflow: hidden; */
line-height: 2rem;
}
pre[class*="language-"].line-numbers.mdit-render > code {
padding-inline-start: 3rem;
padding-bottom: 1.5rem;
line-height: 2rem;
overflow-x: scroll;
overflow-y: hidden;
}
pre[class*="language-"].line-numbers > code {
/* box-shadow: var(--shadow-elevation-low); */
font-size: var(--fs-code);
position: relative;
white-space: pre;
border-radius: 0;
padding-top: 1rem;
padding-bottom: 1.25em;
width: 100%;
}
.line {
position: relative;
height: 2rem;
line-height: 2rem;
align-items: baseline;
padding-inline-start: 3rem;
}
.line-numbers .line-numbers-rows {
--fs-line-numbers: 0.845rem;
background-color: var(--bg-canvas);
border-right: 0.5px solid var(--color-border-outline);
font-size: var(--fs-line-numbers);
height: 100%;
left: 0;
letter-spacing: -1px;
padding: 1rem 0 1.25em 0;
pointer-events: none;
position: absolute;
text-align: center;
top: 0;
user-select: none;
width: 2rem;
}
.line-numbers-rows > span {
color: var(--color-surface-contrast);
pointer-events: none;
display: block;
height: 2rem;
line-height: 2rem;
align-items: baseline;
counter-increment: linenumber;
}
.line-numbers-rows > span::before {
content: counter(linenumber);
color: #999;
display: none;
padding-right: 0.8em;
text-align: right;
}
.codeblock {
width: 90%;
margin: 3rem auto;
background: var(--bg-canvas);
}
span.token {
line-height: 2rem;
text-decoration-line: none;
}
.token.prefix.unchanged,
.token.prefix.inserted,
.token.prefix.deleted {
-webkit-user-select: none;
display: ruby;
margin: auto;
user-select: none;
filter: brightness(1.5);
}
.token.inserted,
.token.inserted-sign {
background-color: var(--code-highlight-add-color);
color: #ffffff;
display: block;
margin: auto;
}
.token.deleted,
.token.deleted-sign {
background-color: var(--code-highlight-delete-color);
color: #ffffff;
width: 100%;
}
.highlight-line,
[class^="highlight-line-"] {
line-height: 2rem;
margin: 0;
padding: 0;
width: 100%;
}
ins.highlight-line-add {
color: var(--code-highlight-inserted-color);
}
del.highlight-line-remove {
color: var(--code-highlight-deleted-color);
}
.token.inserted:not(.prefix),
.token.deleted:not(.prefix) {
display: block;
}
.highlight-line-active,
del.highlight-line-remove,
ins.highlight-line-add {
position: relative;
background-color: transparent;
}
.highlight-line-active::before {
background-color: rgb(85 92 121 / 19%);
}
.highlight-line-active::before {
left: -1rem;
}
.token.deleted::before,
.token.inserted::before,
ins.highlight-line-add::before,
del.highlight-line-remove::before {
content: " ";
position: absolute;
width: 100vw;
}
.highlight-line-active {
background-color: transparent;
color: unset;
display: inline-block;
filter: brightness(1.5);
position: relative;
width: 100vw;
}
ins.highlight-line-add::before {
background-color: rgba(48, 146, 192, 0.185);
}
del.highlight-line-remove::before {
background-color: rgba(243, 220, 9, 0.185);
}
.token.inserted:not(.prefix),
.token.deleted:not(.prefix) {
position: relative;
left: -1rem;
width: 100vw;
}
.mdit-render del.highlight-line-remove,
.mdit-render ins.highlight-line-add {
text-decoration-line: none;
width: 100%;
}
Code Sample
Feel free to experiment with the implementations discussed in this tutorial. As a starting point, here's a sample 11ty project set up with the code from this guide.11ty Sample Project
Open Issues
Some open issues that are relevant to adding line numbers:
Links